This is the long version. The other guides each cover one workspace. This one builds a whole wedding site from the first click to the last, in the order that works best, using the names of the controls you will actually press. The plan it follows is a common one. A ceremony and evening party that anyone with the link can reply to. A wedding breakfast with a fixed guest list and a menu. A running order, directions, questions answered in advance, songs for the DJ and a gift registry. Skip whatever you don’t need. None of it has to happen in one sitting, because the studio saves as you go.
1. Create the event
Sign up and you land in the wizard. It has four steps and takes about a minute. The full detail is in Create your event.
Pick the Wedding template.
On What’s the occasion? choose Wedding, the one marked Recommended. It starts you with a cover, a countdown, a schedule, the venue, an FAQ, a photo album and an open RSVP. All of them can be renamed, reordered or deleted.
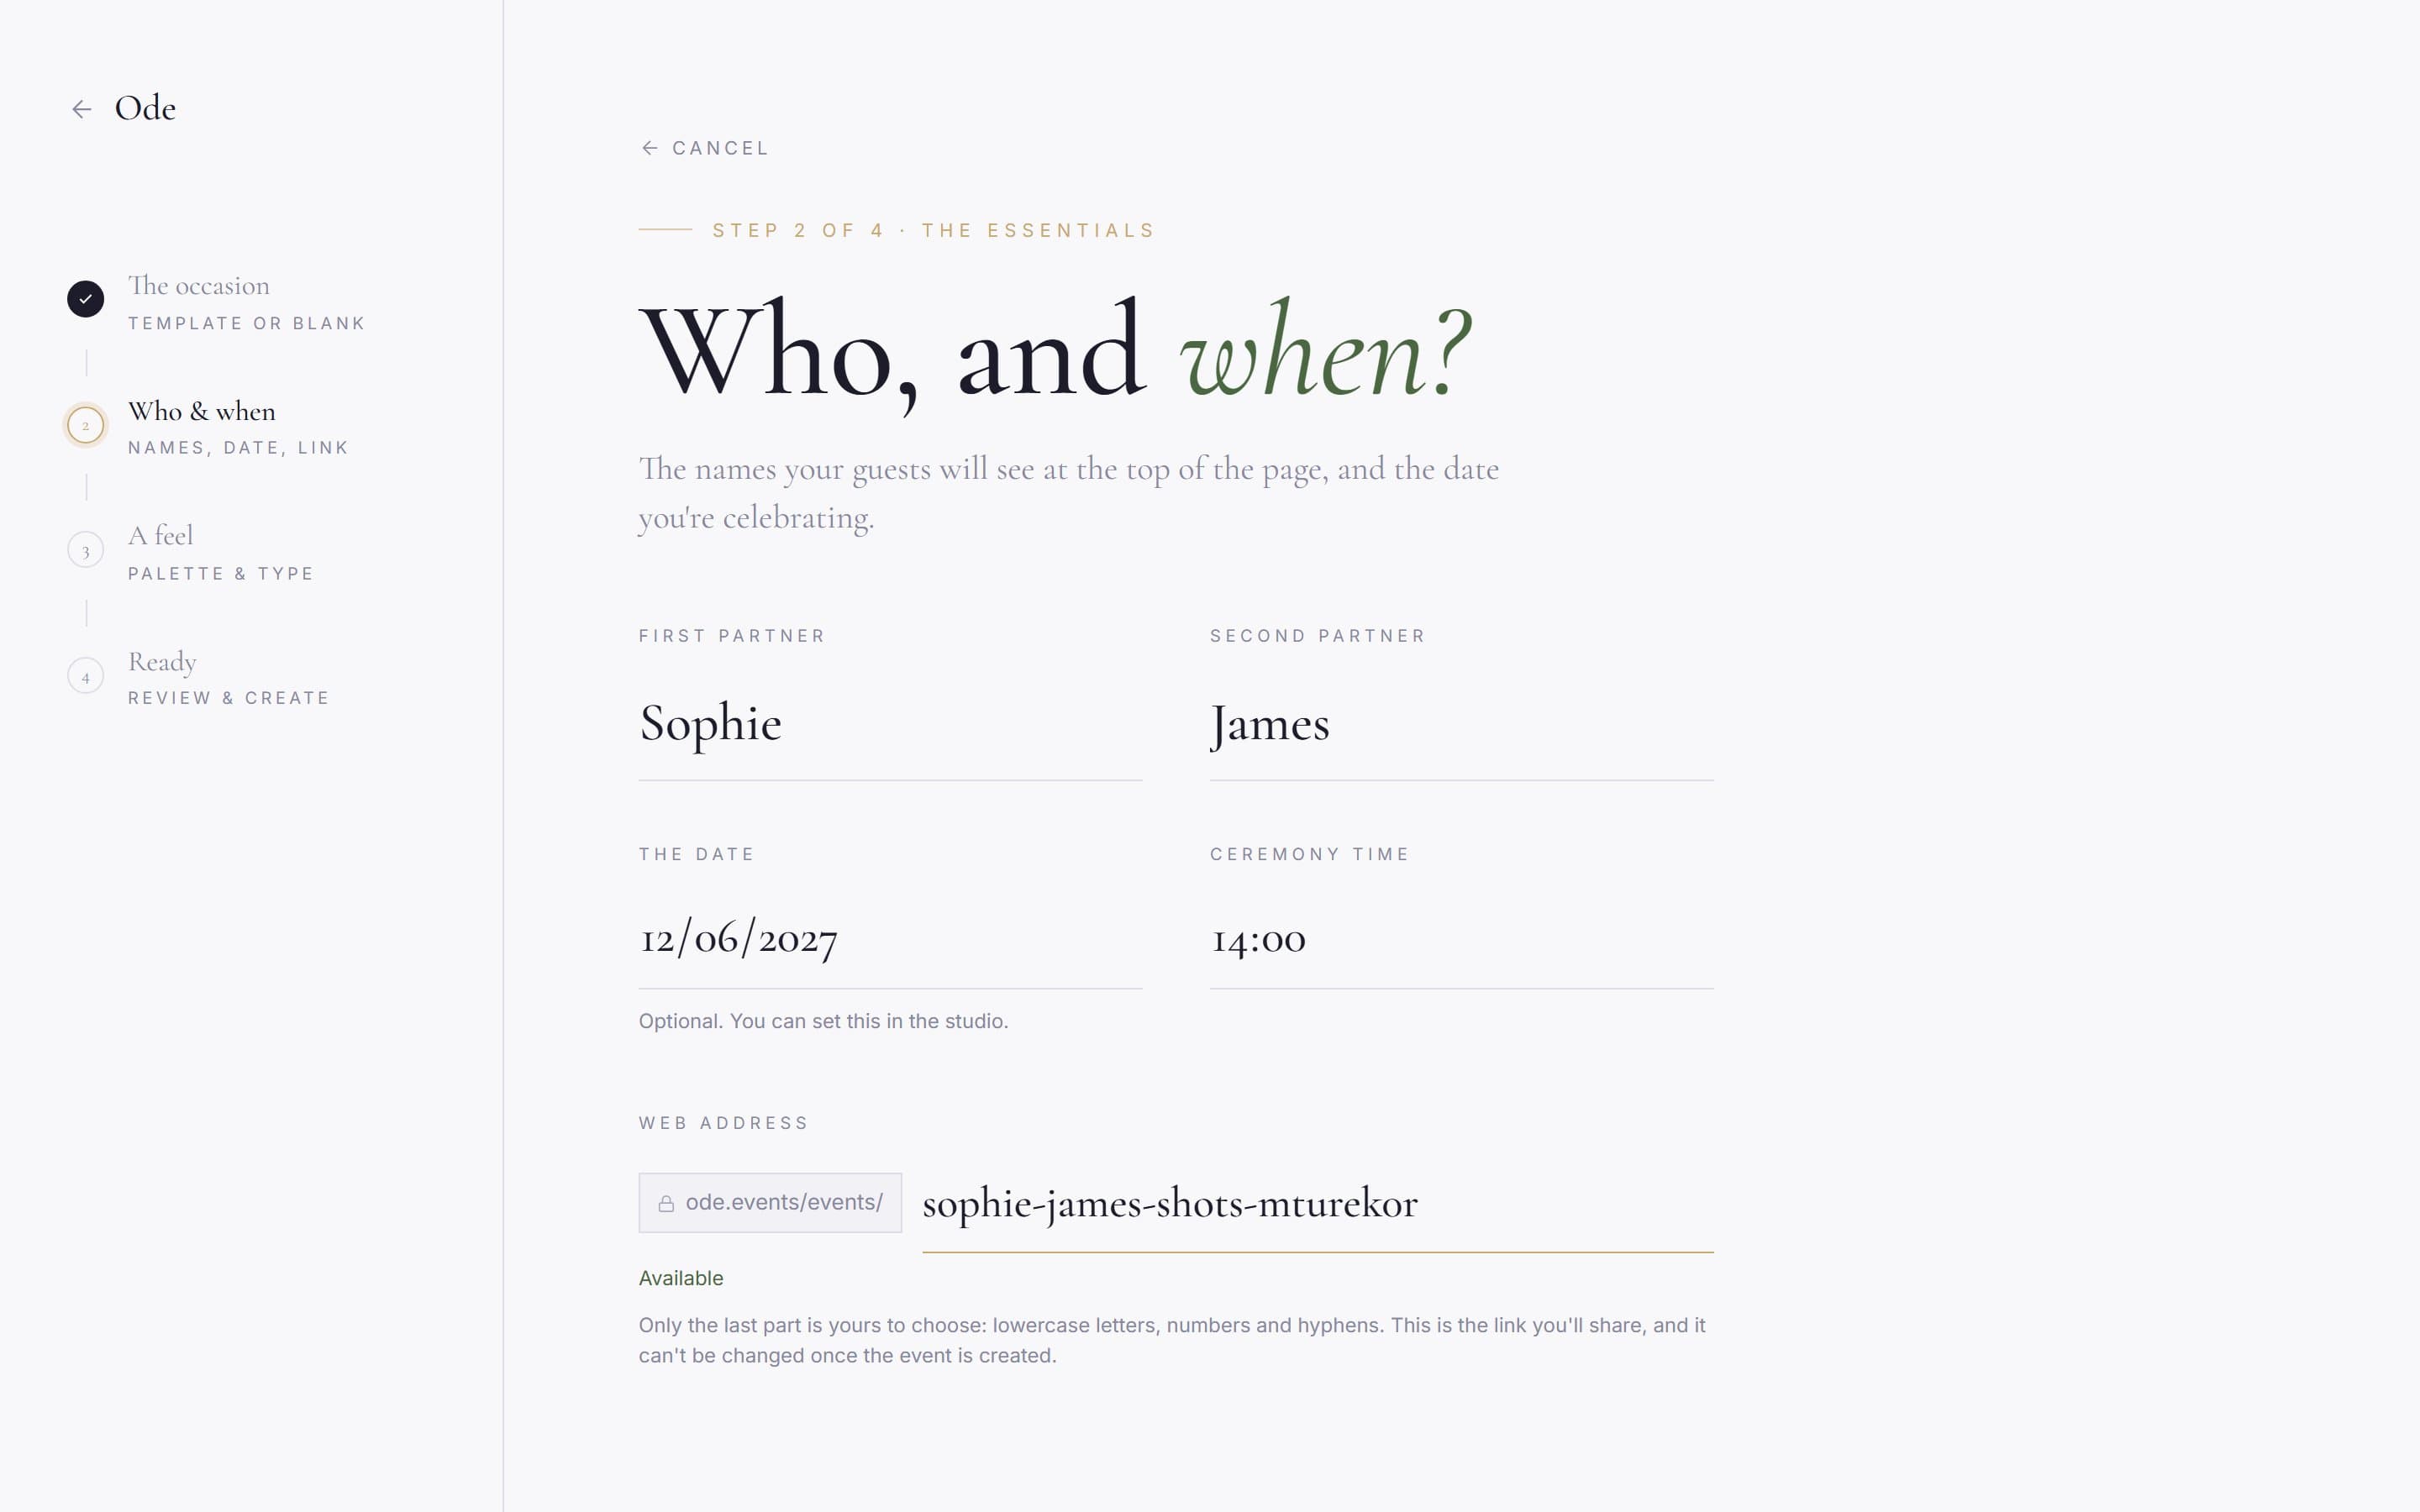
Names, date and your web address.
First partner and Second partner become the names on the cover. The date is optional here, but the countdown, the album window and the RSVP retention date all use it, so add it now if you know it. Add the Ceremony time too.
Web address is the one choice you cannot change later. The prefix is fixed. You choose the last part in lowercase letters, numbers and hyphens, and the field checks it as you type until it reads Available. Pick something you would be happy to print on an invitation.
Choose a palette and type style, then create.
Set the tone. offers six palettes and five type styles. Treat it as a starting point. You will revisit both in the Design workspace in a moment. Press Continue →, check the summary on Everything’s set. and press Create event →. The footnote means what it says: Free to build and preview. Choose a plan when you’re ready to go live.
2. Set the wedding date and timezone
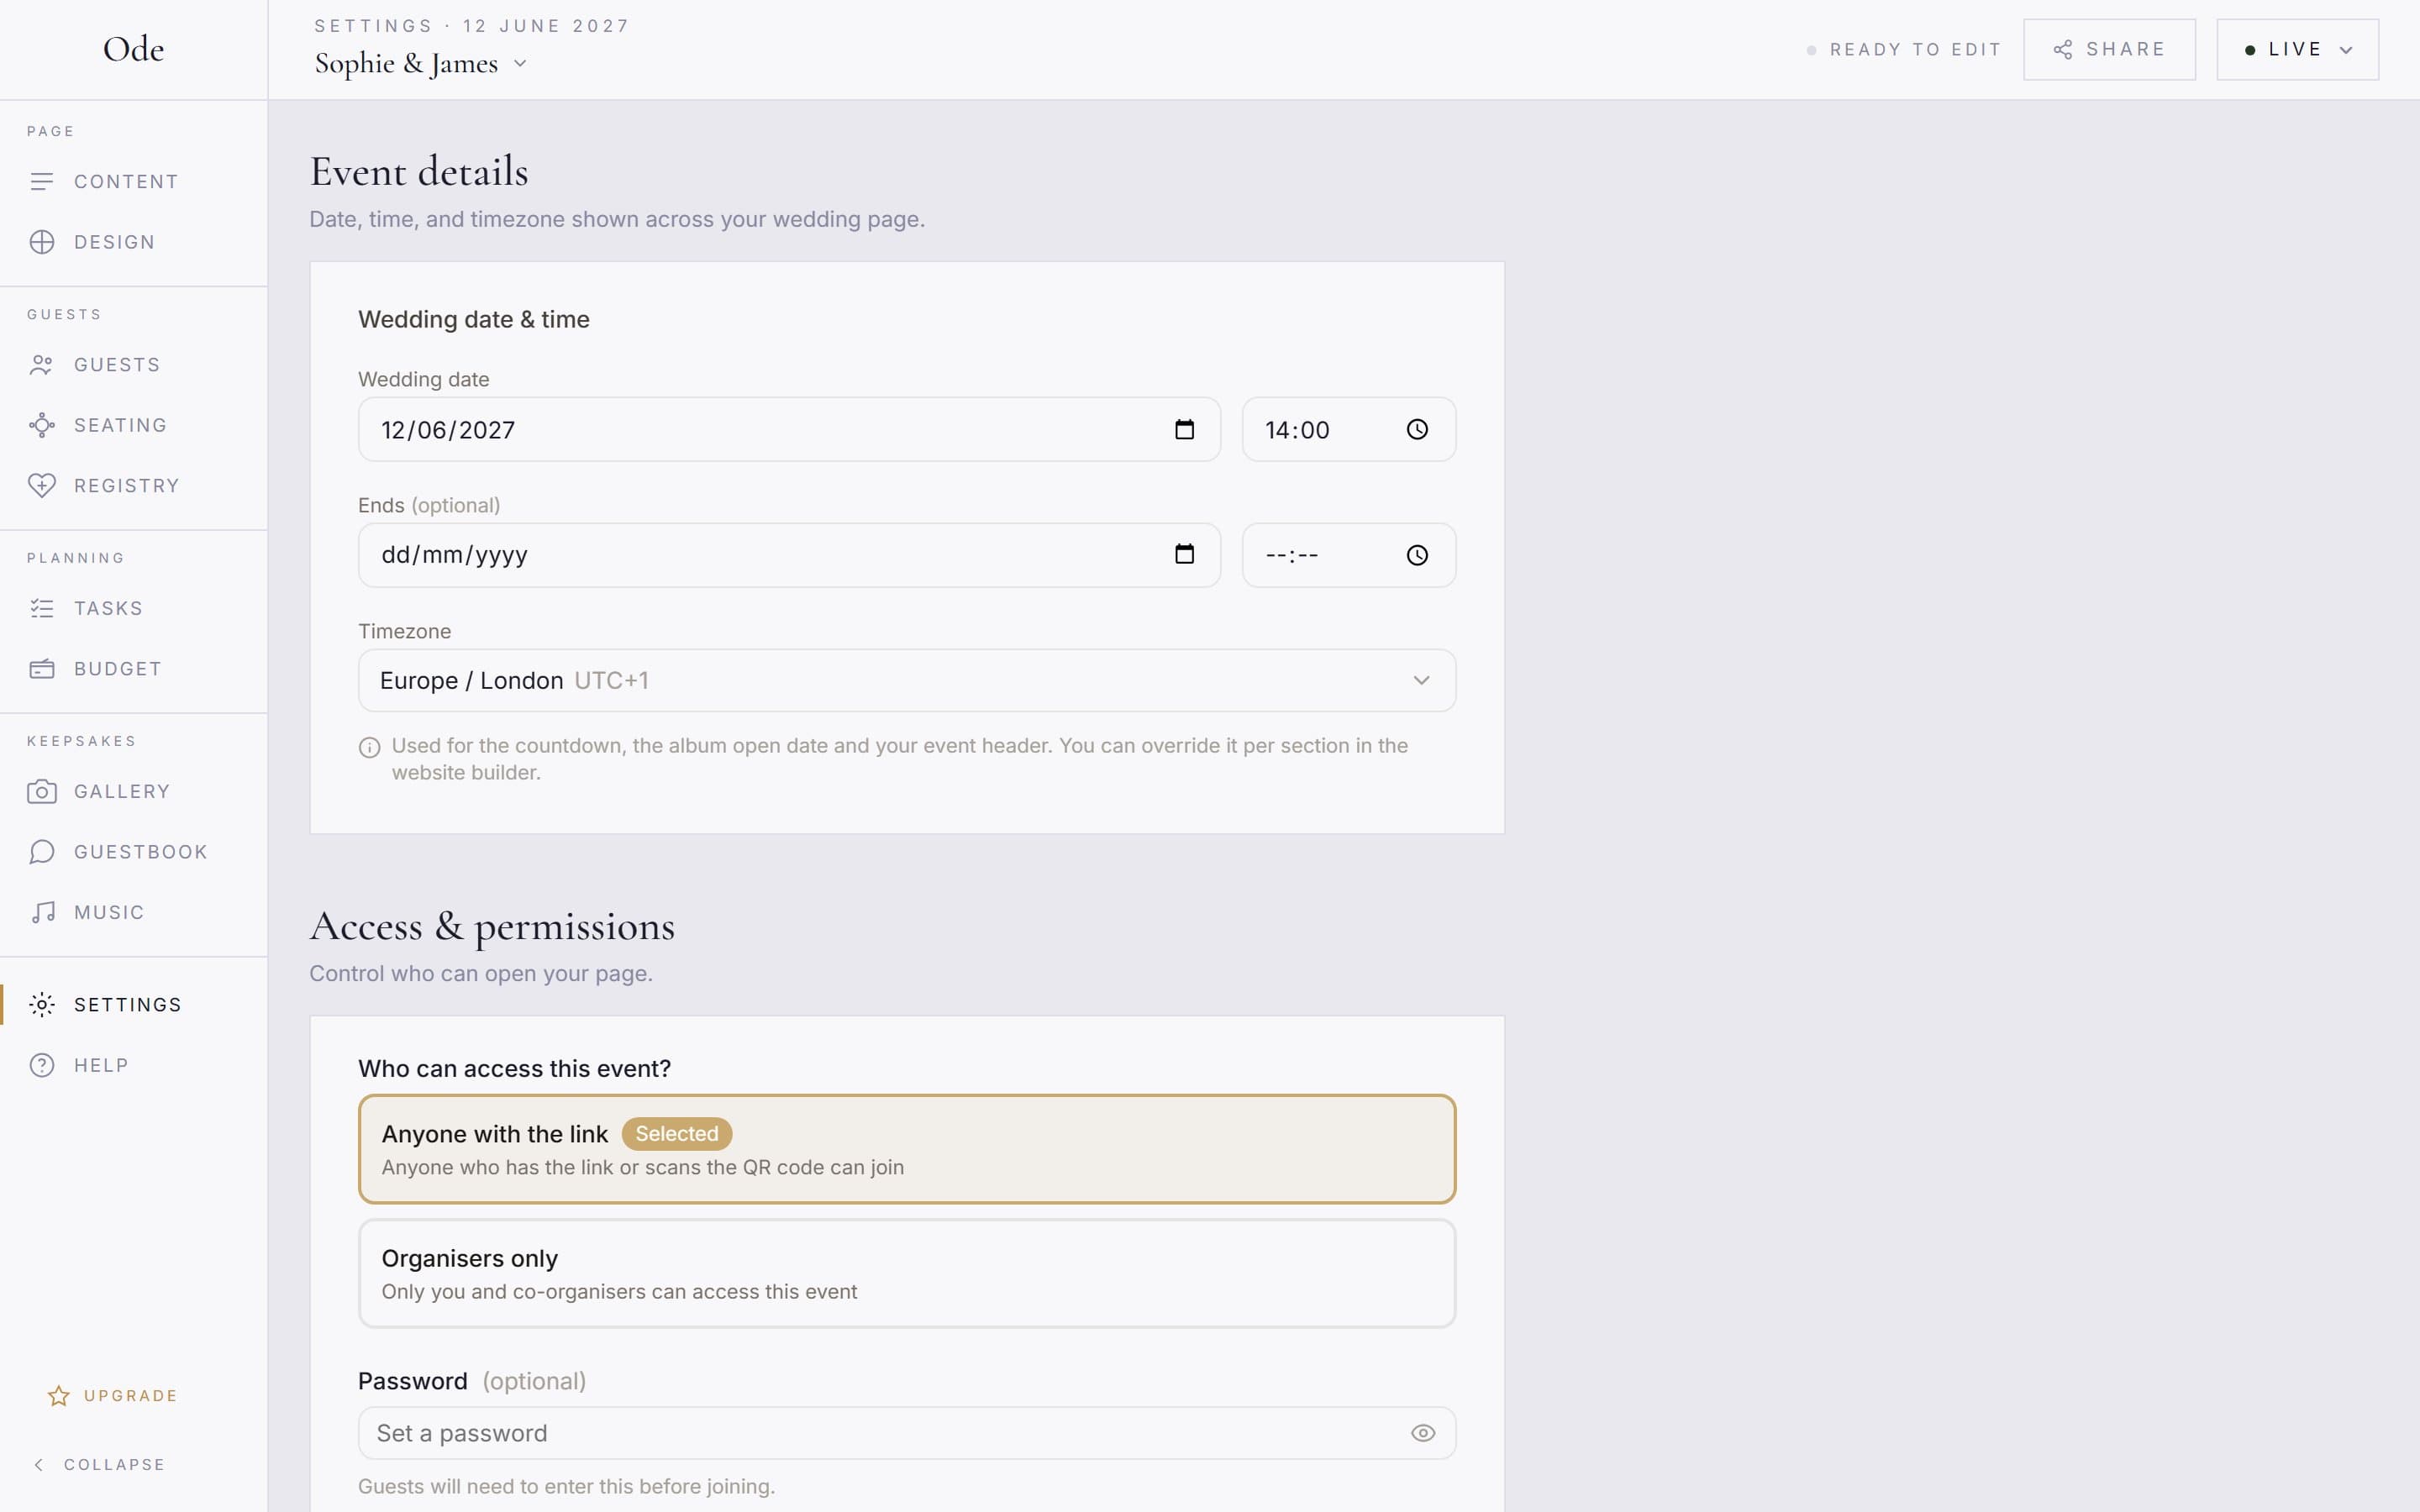
You arrive in the studio on the Content workspace. Before touching the page, go to Settings in the rail on the left and check Event details. There you set the Wedding date with its time, Ends (optional) for a multi-day celebration, and the Timezone. The timezone matters more than it looks. The countdown, the album open date, the RSVP deadline and the event header all read it.
3. The cover
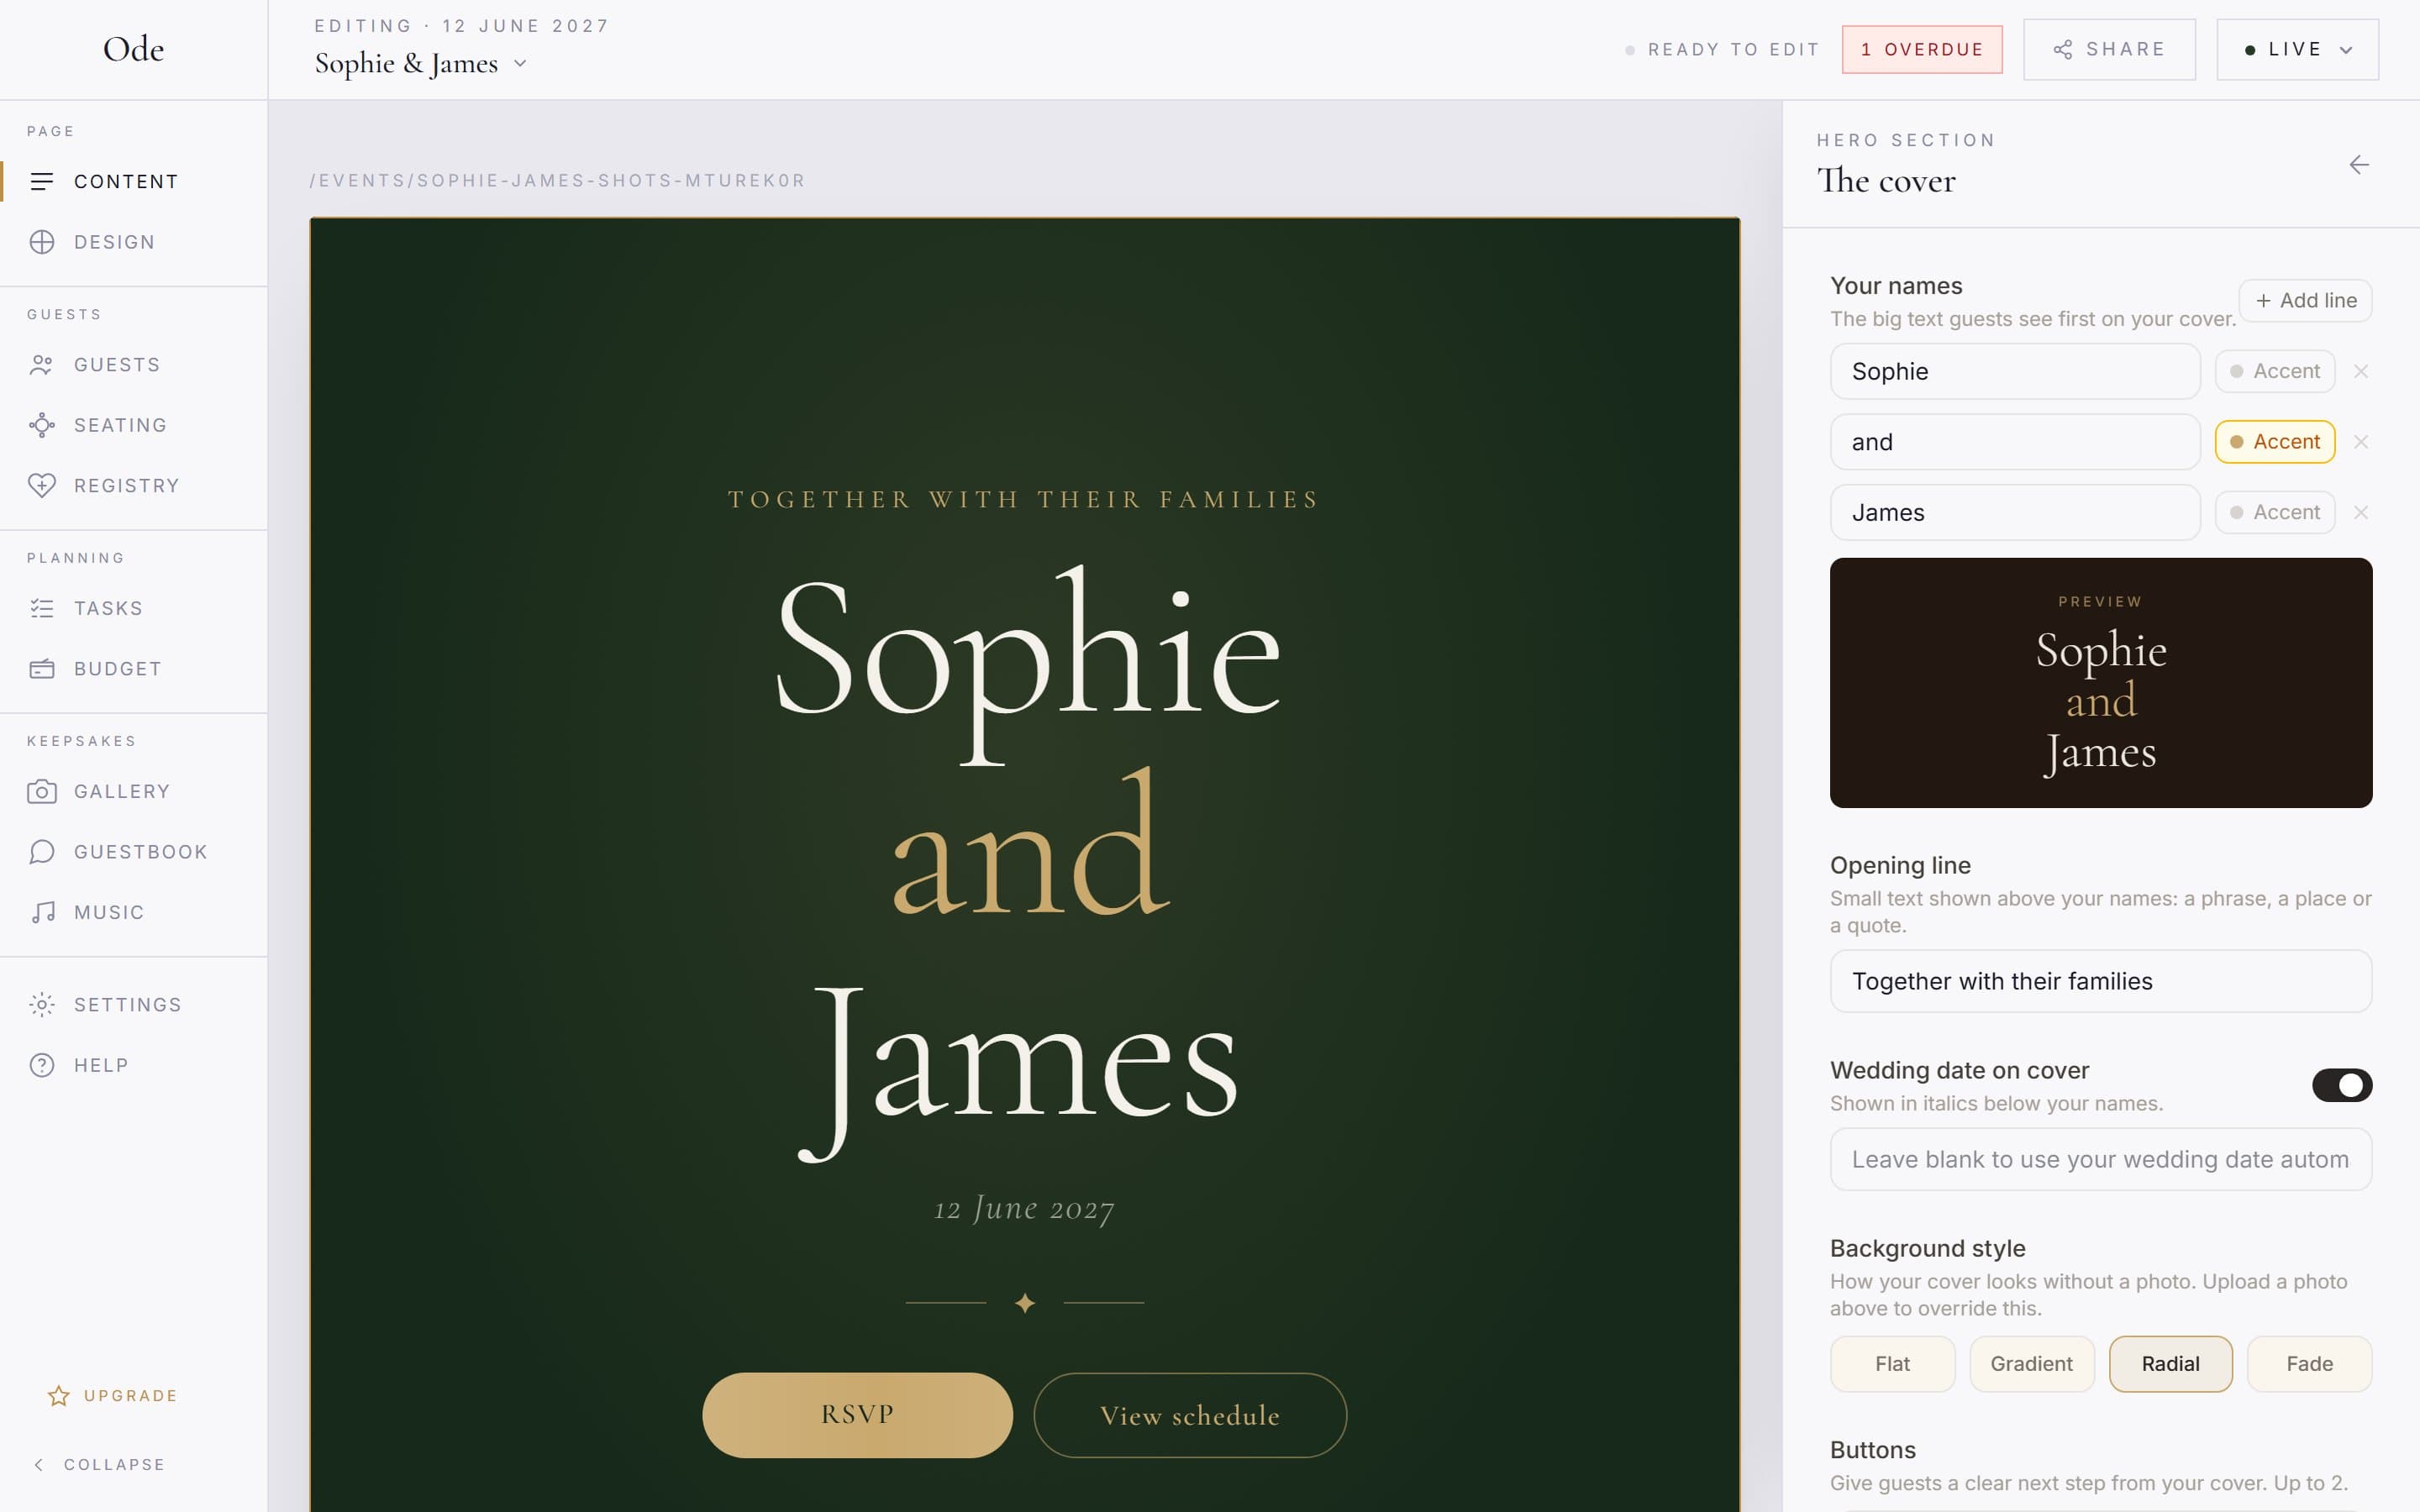
Back in Content, click the hero at the top of the canvas. It is listed as Cover in the sections list on the right. The inspector opens with the cover’s controls, top to bottom.
Your names.
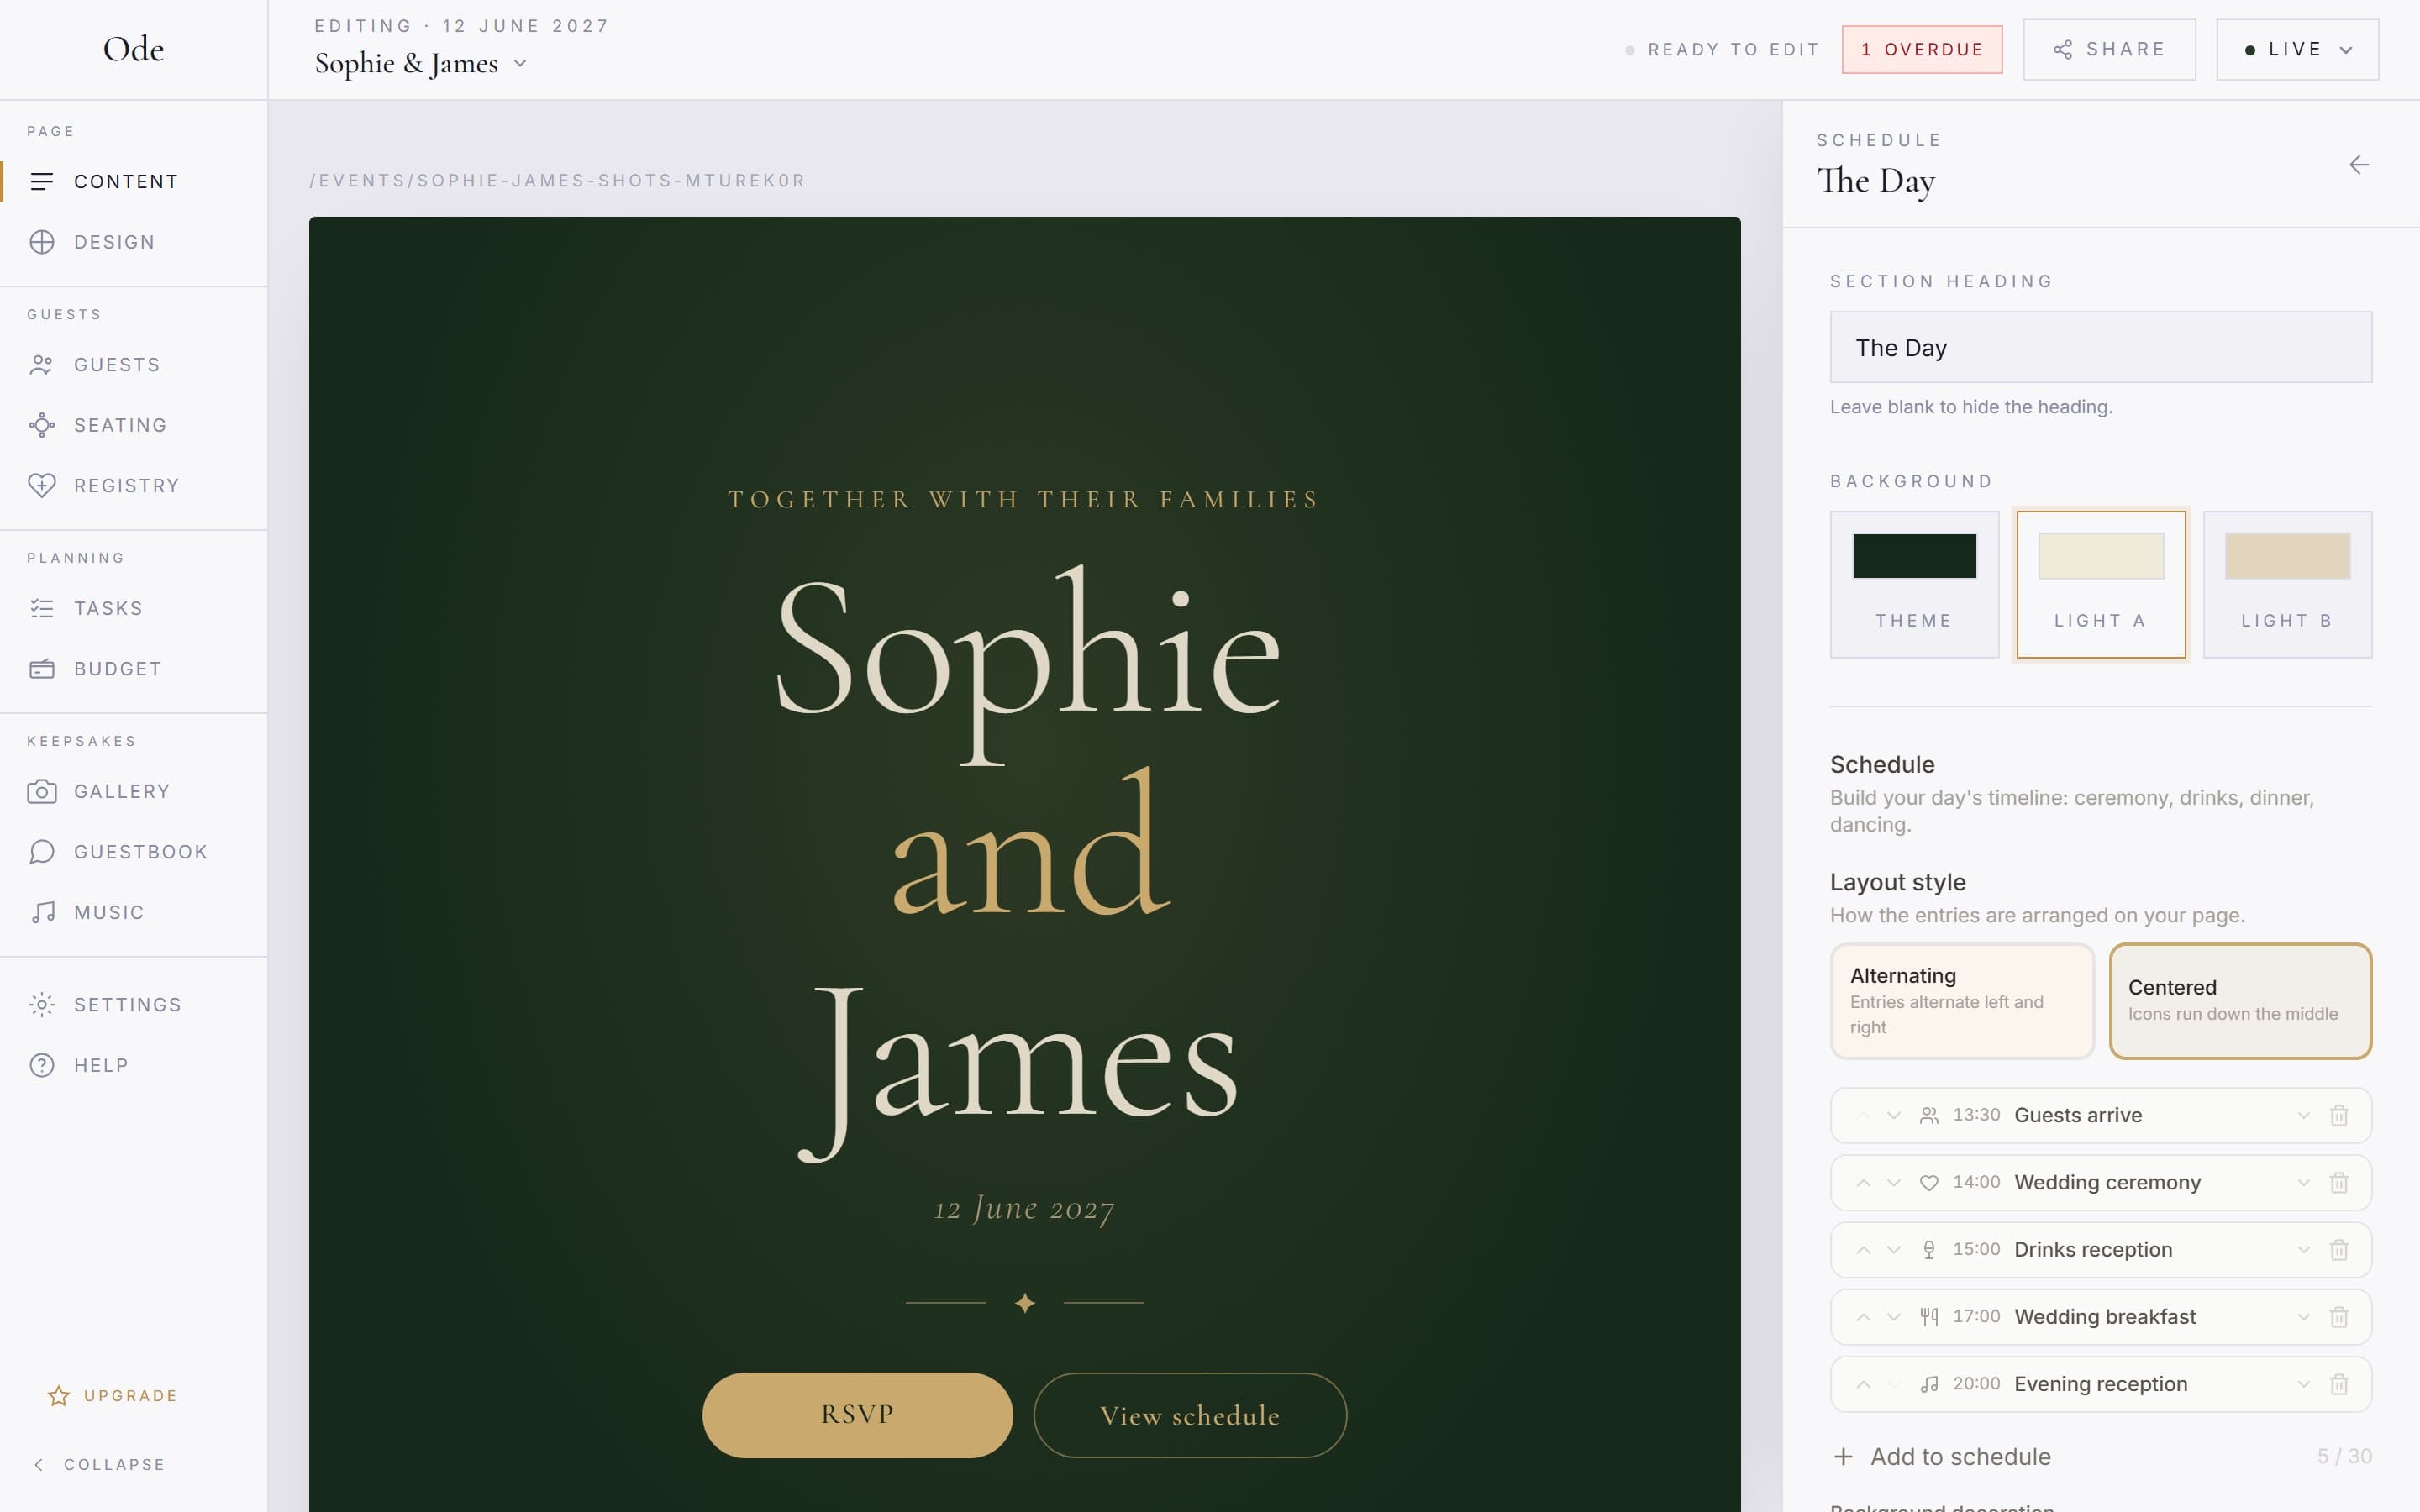
By default the cover shows the event name as one line. Press Add line to split it across rows, up to four. The template already gives you three: “Sophie”, “and”, “James”. Each line has an Accent toggle that paints it in your accent colour, which is how the “and” ends up gold. A small Preview block shows the result.
Opening line and date.
Opening line is the small text above the names. The template fills it with “Together with their families”. Wedding date on cover is a toggle. Leave its text field blank and it prints your wedding date automatically, or type your own wording such as “Saturday, 12th June 2027”.
Upload the cover photo.
Under Photos there are two slots. Cover photo is the full-width background behind your names. Landscape works best, and a venue or engagement shot is the usual choice. Portrait photo is a small photo in the bottom corner that is hidden on phones. Press Click to upload on either slot. Hover later for Replace and Remove. With no cover photo, a Background style control offers Flat, Gradient, Radial and Fade in your palette colours.
The two buttons.
Buttons gives guests a next step from the cover, up to two. Each has Button text, a Takes guests to dropdown listing the sections on your page, and a Style of Solid (stands out) or Outline (subtle). Sections you have not added yet are greyed out in the dropdown. The template starts with RSVP and View photos. For this plan, point the first at the evening RSVP and change the second to View schedule, pointing at the schedule.
4. Palette, custom colours and fonts
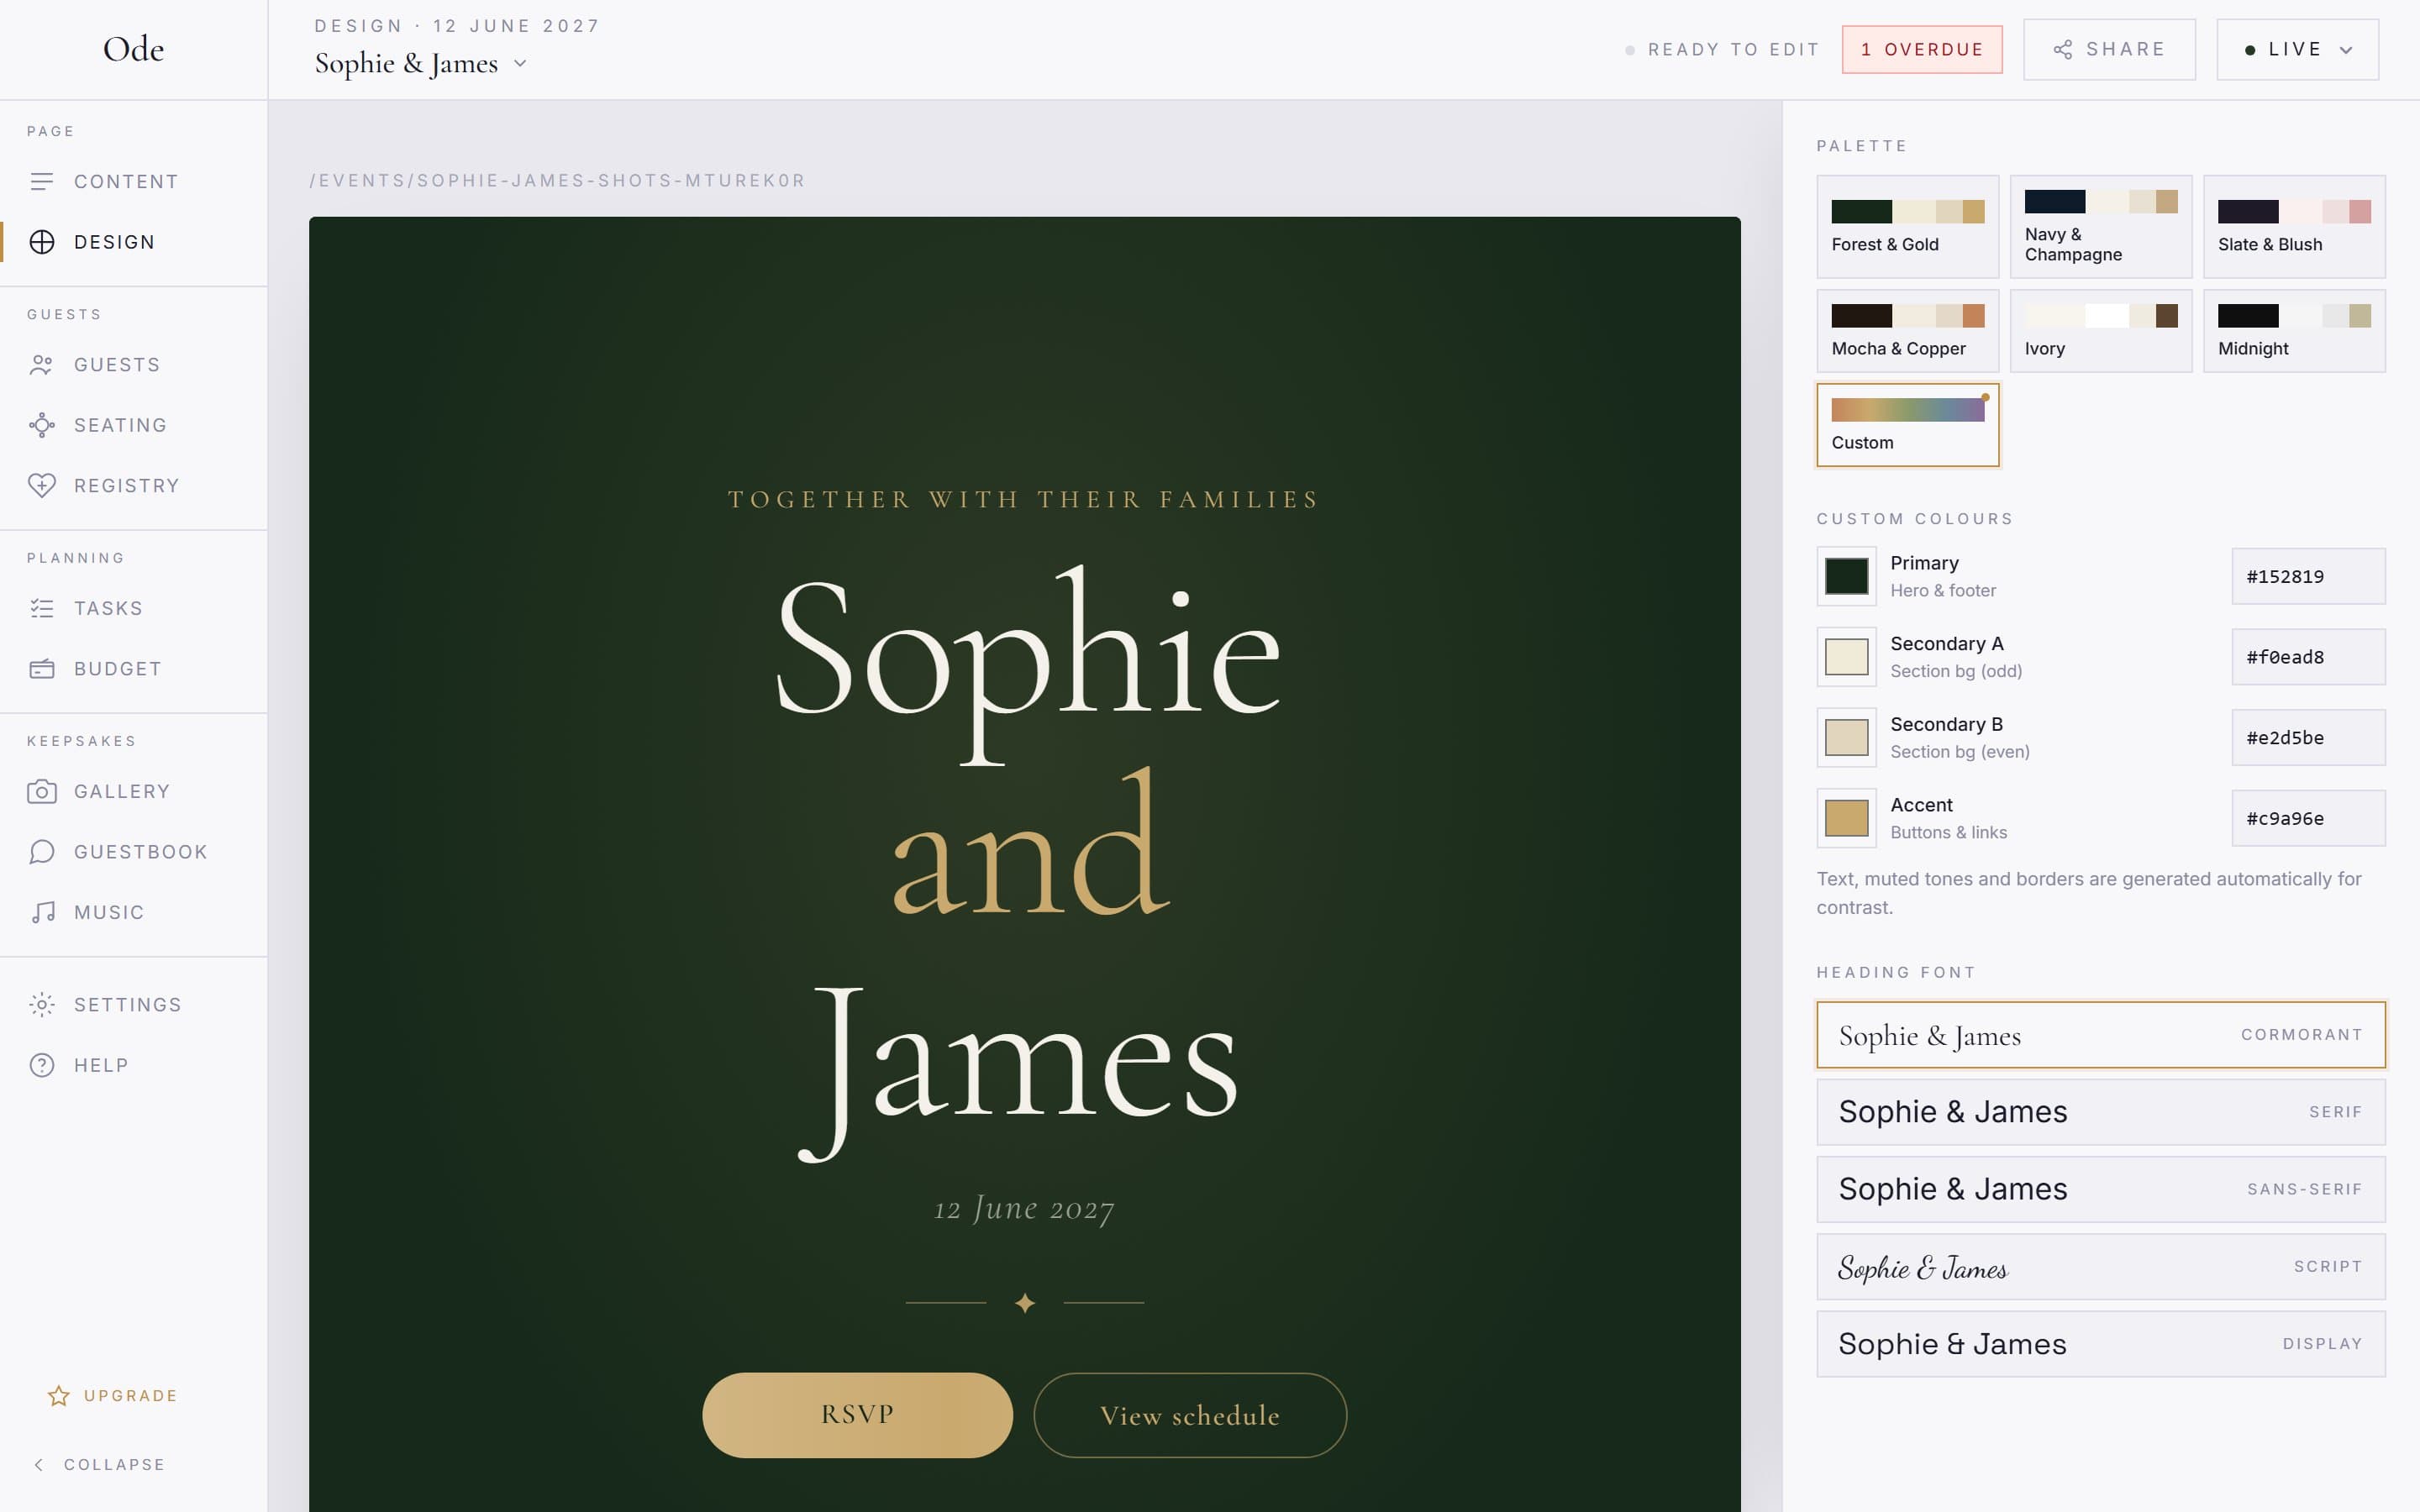
Press Design in the rail. The inspector switches to page-wide controls. There are six Palette tiles, a Heading font list that previews your names in each style, and an Accent colour with a hex field, six presets and a Reset link. Everything previews live on the canvas.
The seventh palette tile is Custom. On Free it carries a lock and opens the upgrade modal. On Starter and above it reveals Custom colours with four hex fields. Primary is the hero and footer. Secondary A and Secondary B are the alternating section backgrounds. Accent is buttons and links. Text, muted tones and borders are generated for contrast. If you have exact colours from your stationery, this is where they go. If not, a preset palette with a tweaked accent looks better than four guessed hex codes.
5. Section by section
Back in Content, the sections list on the right is your page from top to bottom. Drag the handle on the left of a row to reorder. The eye icon hides a section while you draft, and the bin deletes it. + Add section opens the library, which shows every type with its limit. Tiles you have used up read Max 1 reached. Click a row to open that section’s inspector. Every section shares two controls at the top. Section heading can be left blank to hide the heading. Background is Theme, Light A or Light B, which is how the page alternates dark and light bands.
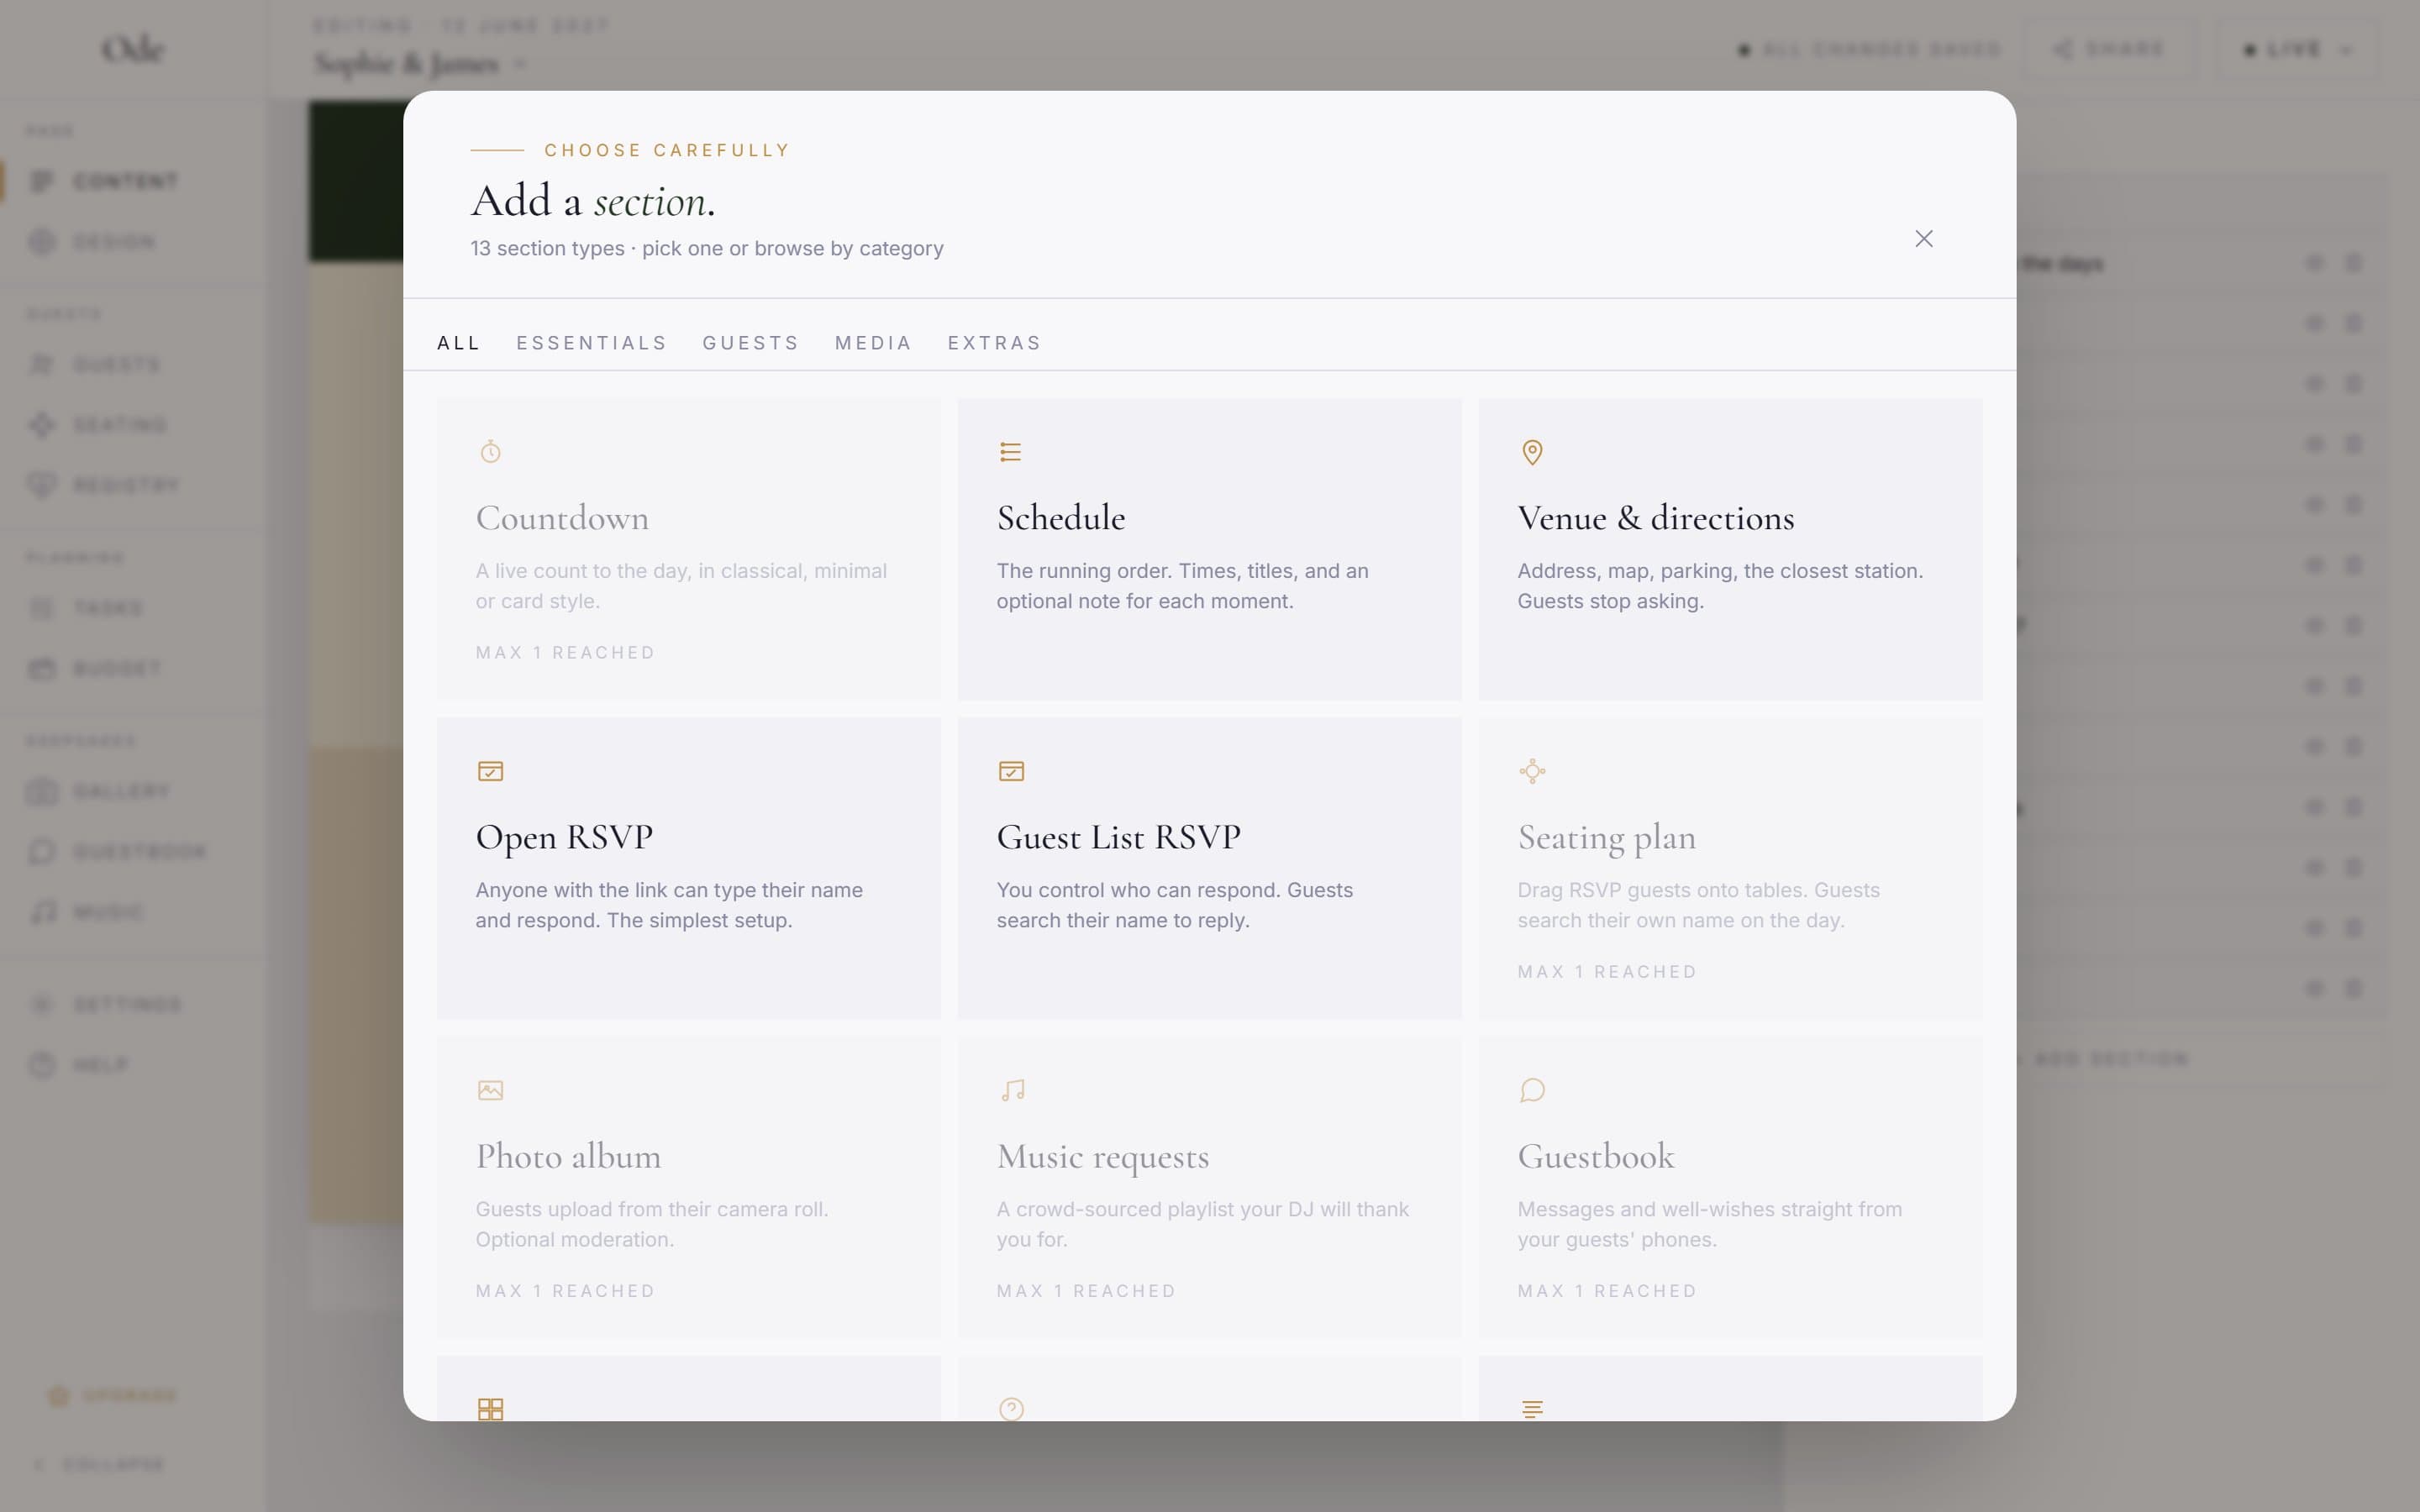
Here is the order this walkthrough uses. It is also a sensible order for guests to scroll through. The names in brackets are the section types in the library.
Counting down (Countdown).
The template includes one. Countdown label is the line under the numbers, such as “Until we say I do”. Countdown target reads Using your wedding date once you have set one in Settings. Press Use a different date only if you are counting to something else. Display style offers Rings, Minimal, Cards and Elegant.
Our story (Text & story).
Add it from the library under Extras. The default heading is A note from us, so rename it. There is one field, Your message, with room for 5,000 characters. Three of these sections are allowed, so you can use another later for a thank-you or a travel note. Below the text, Background decoration adds the Botanical line art with a Placement of Left, Right, Both sides or Full, and an Opacity slider. The default is 15% and it rarely wants to go above 25.
The day (Schedule).
The template’s schedule already has five entries. Each row expands into Time, Title and Description (optional). The chevrons reorder, and the bin deletes after a Delete? confirmation. Layout style is Alternating, where entries alternate left and right, or Centered, where icons run down the middle. In Centered each entry also has an Icon chosen from a small set such as Clock, Heart, Drinks, Utensils and Music. Add to schedule takes you up to 30 entries. Write times as guests would say them, like “1:00 PM”, and keep descriptions to one line: “We say our vows in the Garden Room.”
The venue (Venue & directions).
The template calls it The Venue. Fill in Venue name, Address and Notes for parking, nearby hotels and what to wear. Switch on Show map & directions and press Look up from address. When it succeeds the panel reads Pin set with the coordinates and a View on map → link. If the lookup cannot find a rural venue, open Enter coordinates manually and paste the latitude and longitude from the venue’s own site or a map app.
Cards (optional) adds up to six small tiles under the map for the practical questions. Press Add card, pick an Icon such as Car, Train, Taxi, Hotel or Parking, then give it a title like “By car” and a short description. Three cards, for car, train and where to stay, cover most weddings. You can add up to three venue sections if the ceremony and reception are in different places.
Good to know (Info cards) and questions (FAQs).
These two overlap, so choose deliberately. Info cards are tiles for short facts. Each has an Icon, a title, a description and an optional Website link, which suits the dress code, a gift note, a taxi number or the hotel’s booking page. Up to eight per section and two sections per page. FAQs is a list of questions and answers for anything that needs a sentence or two. Press Add question, type the question, such as “Is there a dress code?”, and fill in Your answer…, up to thirty of them. A good split is five or six info cards for the facts everyone needs, and an FAQ for the things only some guests ask. Children, plus-ones, dietary needs, what time it ends, whether there is a bar.
6. RSVP one: the evening, open to anyone with the link
The template’s RSVP section is an open one, and open is right for the evening. Anyone with the link types their name and replies, and there is no list to maintain. Its inspector on the page only offers Go to Guests →, because the form is configured in its own workspace. Press Guests in the rail and click the section, badged Open, in the list on the left.
Rename it and set the form.
Click the title at the top of the pane to rename it. “Evening celebration” or “Will you join us in the evening?” makes the two forms easy to tell apart later. On Configure > Form you set the Custom message shown above the form, the Button label with its default of RSVP, the RSVP deadline (optional), and Allow plus ones with a Max plus ones per guest of one to five. For an evening party, plus-ones on with a maximum of one or two is the usual setting.
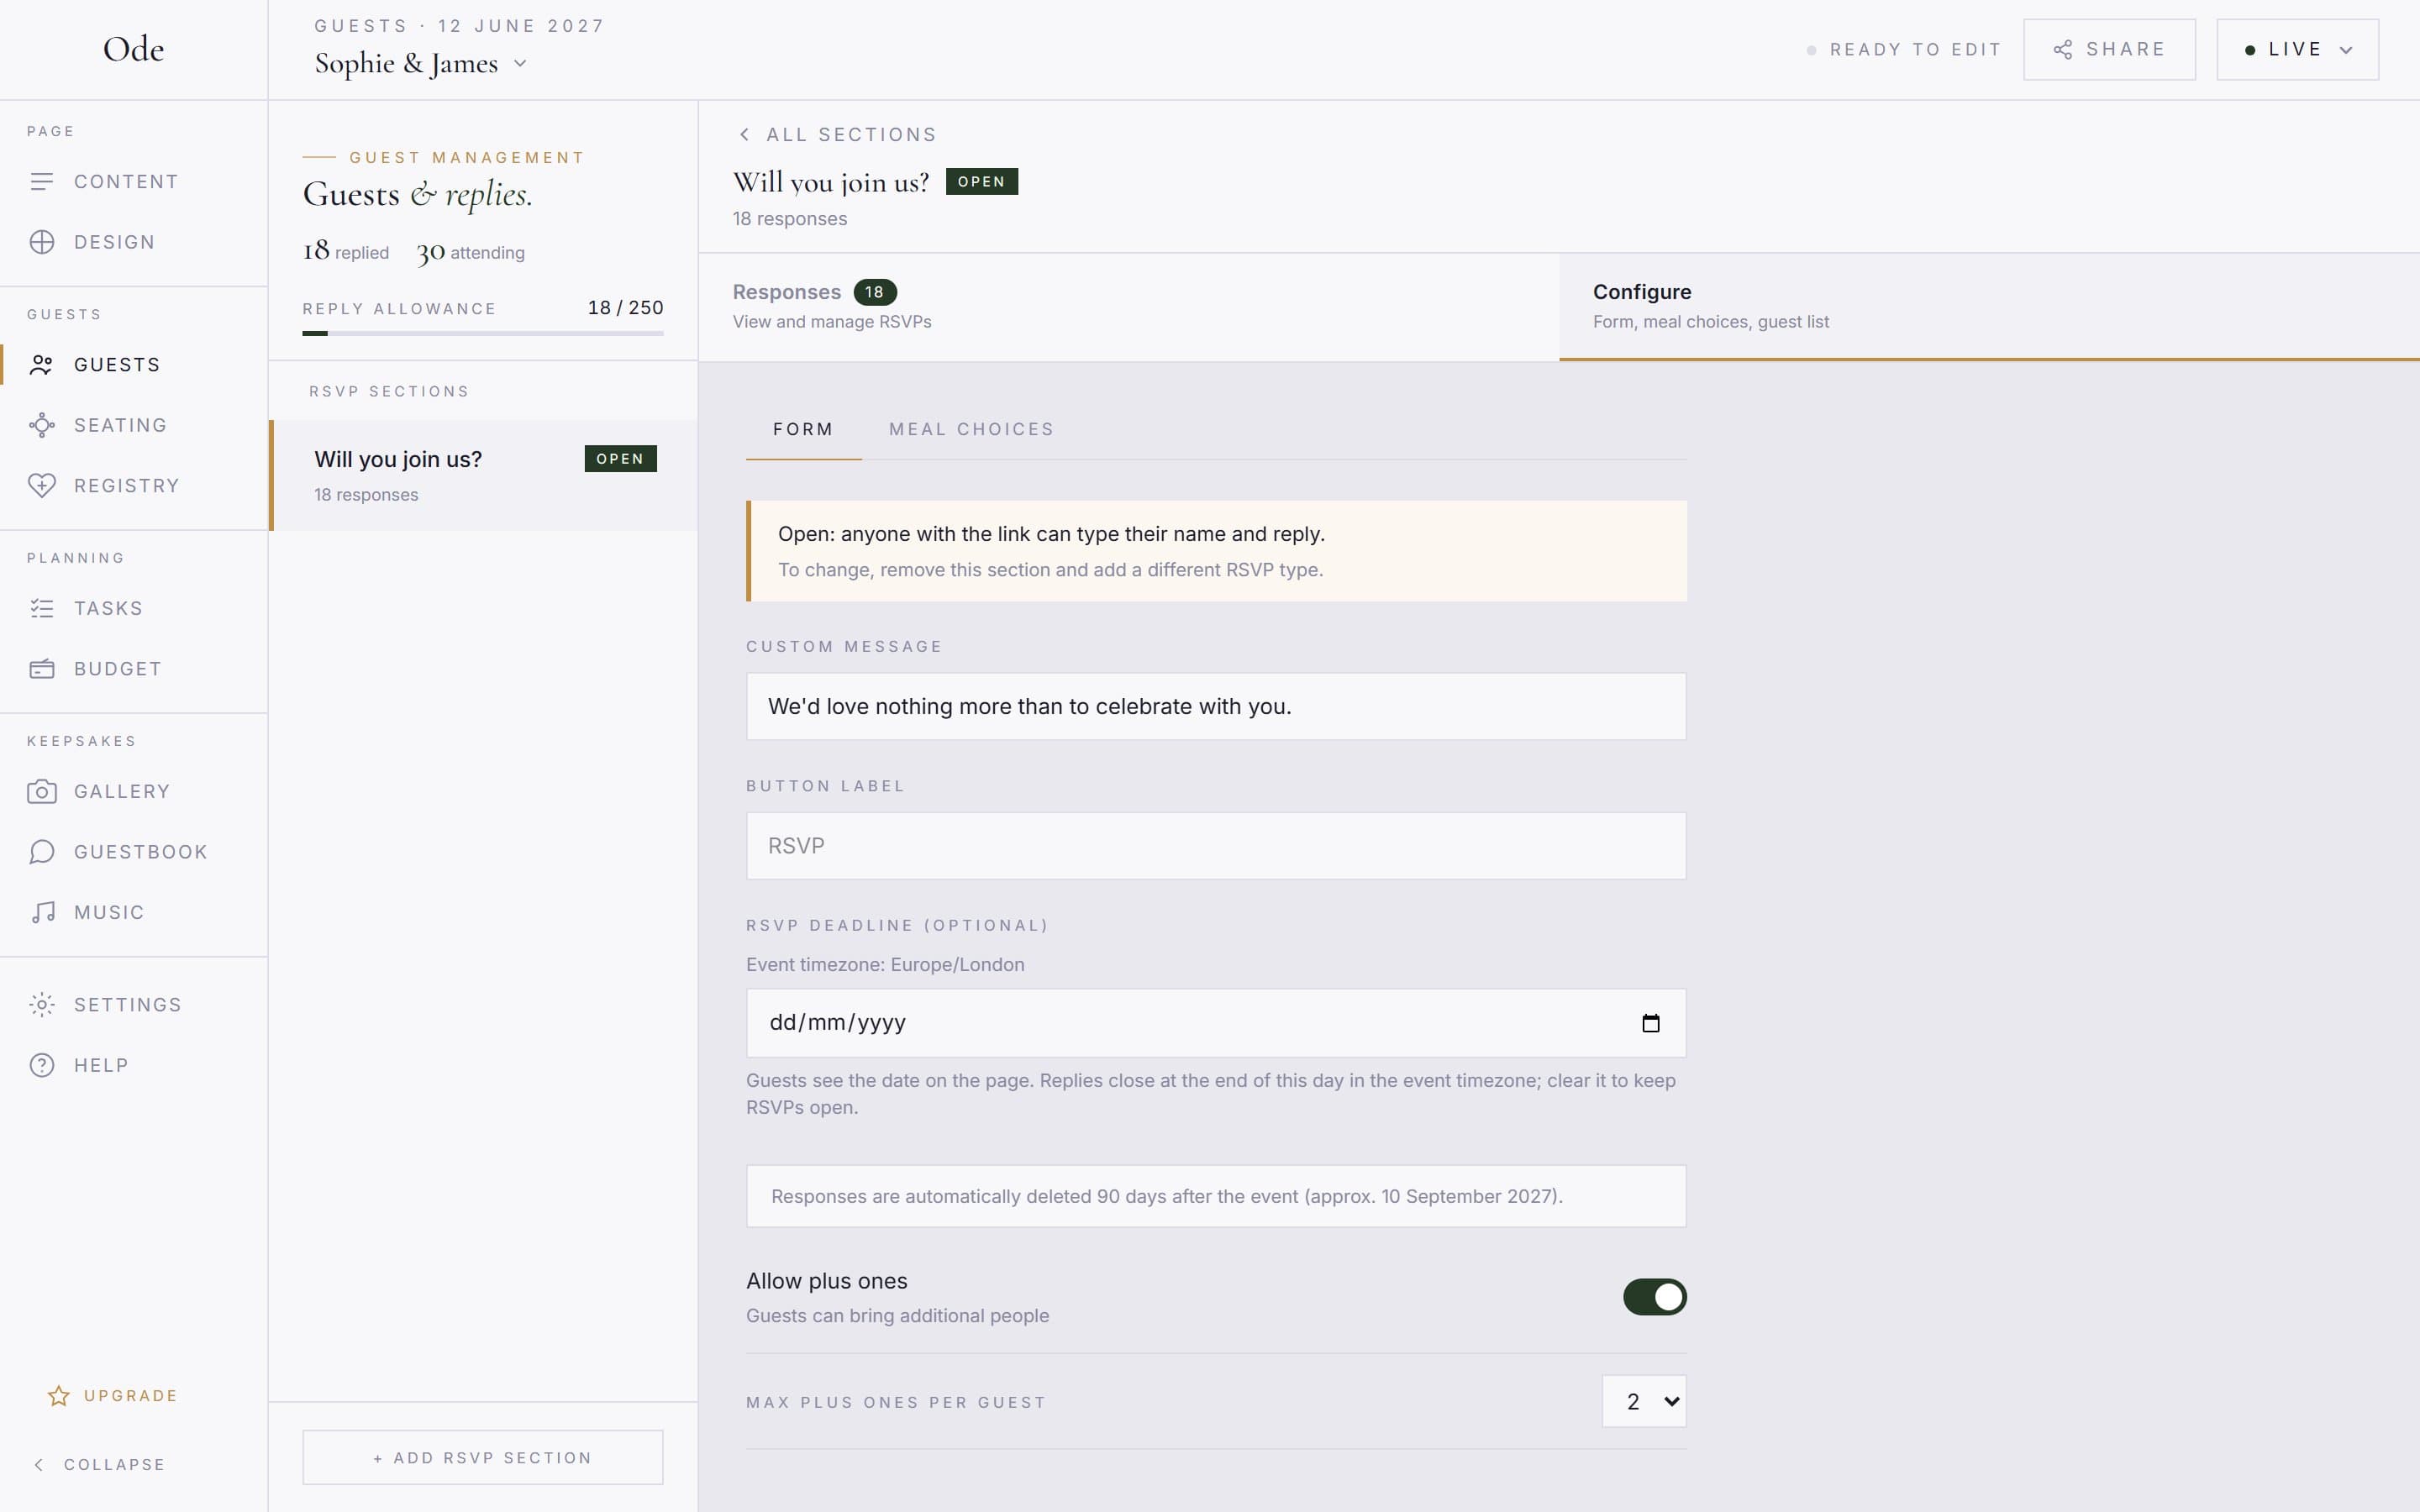
Leave meal choices off.
The Meal choices sub-tab exists on every RSVP section, but an evening buffet does not need one. Leave Enable meal choices off here. The wedding breakfast form below is where the menu lives. Every reply still lands on the Responses tab with a name, who is coming and an optional message.
Set the deadline.
Pick the date on RSVP deadline (optional). Guests see it on the page as “Please RSVP by…” and the form closes at the end of that day in your event timezone. Four to six weeks before the day is typical. Our RSVP deadline guide has the reasoning.
7. Unlock Plus from a lock badge
The next RSVP needs the Plus plan, and so do music requests, the seating plan and the catering summary. You do not have to publish to get them. Everything on a higher plan carries a lock, and paying through the lock upgrades the event while the page stays private.
Press the locked tile.
Open the library with + Add section. The Guest List RSVP tile carries a Plus ribbon, and the Guestbook tile says Starter. Press it and a modal headed Unlock Guest List RSVP. opens. A line reads Currently on Free · 20 photos · 7-day album, and each higher plan has a card showing only what it adds. The same modal opens from every other lock: the Music and Seating items in the rail, marked Plus only on a phone, the Custom palette tile, the Requires Plus plan card in the Guests workspace, the Upgrade plan button in the catering panel, the Upgrade item at the bottom of the rail, and Settings > Plan & billing.
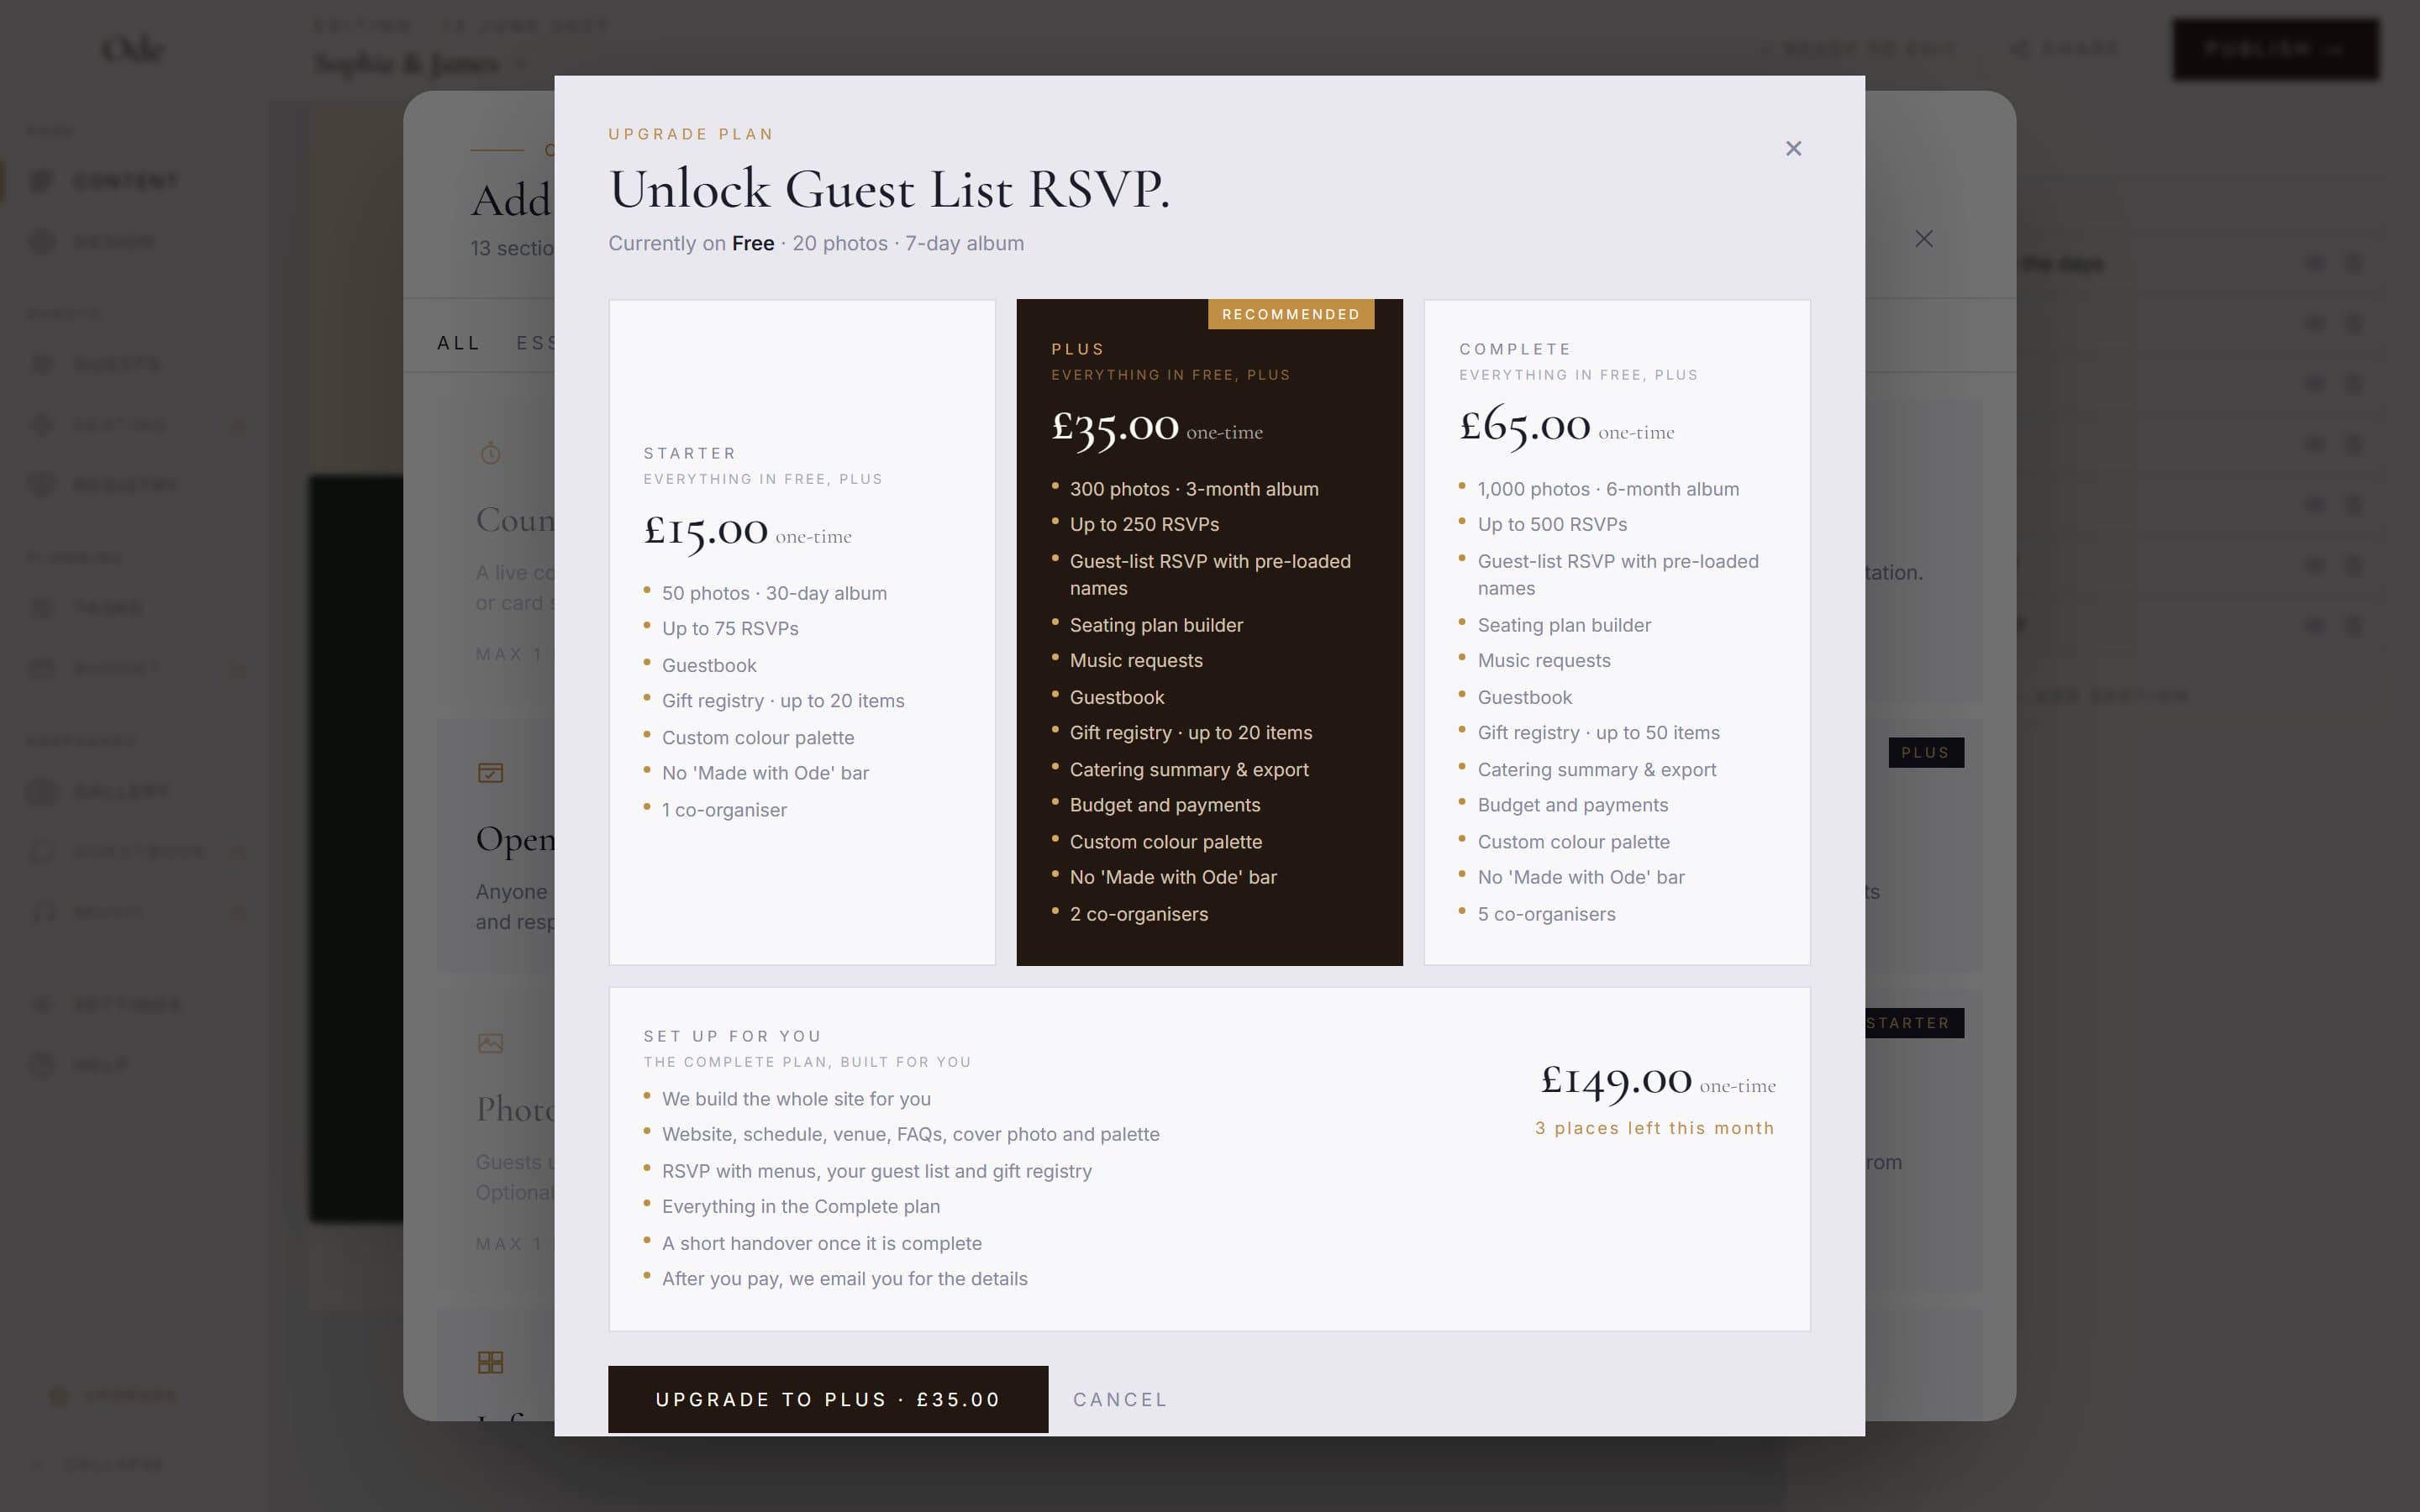
Pay once.
Select Plus, press Upgrade to Plus · £35.00, then Confirm: go to checkout. Payment is a one-off on a Stripe checkout page, where you also accept the terms. You return to the studio with the tile unlocked and Settings > Plan & billing reading Current plan Plus. The page is still not public. The masthead now shows a Draft pill where Publish → used to be, because the plan is paid for but you have not switched the page on.
Go live when you are ready, from the pill.
Click the Draft pill and choose Live. If you never set a wedding date, Before you go live asks for it first. That is covered in section 12, so keep building until then. If you would rather go live now, on any plan, Publish → opens Choose your plan. and does the same job in one step. Either way, an upgrade from a paid plan later costs only the difference.
8. RSVP two: the wedding breakfast, guest list with menus
The day guests are a fixed list, and the caterer needs a choice per person. So this form is a guest-list RSVP with meal choices. Guests find their invitation by searching their name, and nobody outside the list can reply. The detailed guide is Set up RSVPs and meal choices.
Add the section.
In Content, press + Add section and choose Guest List RSVP under Guests. In the Guests workspace the same thing is + Add RSVP section, then Guest List RSVP and Create. Rename it to something like “Wedding breakfast”. Drag it above the evening form in the sections list so day guests see it first. Evening-only guests scroll past it to theirs.
Build the menu.
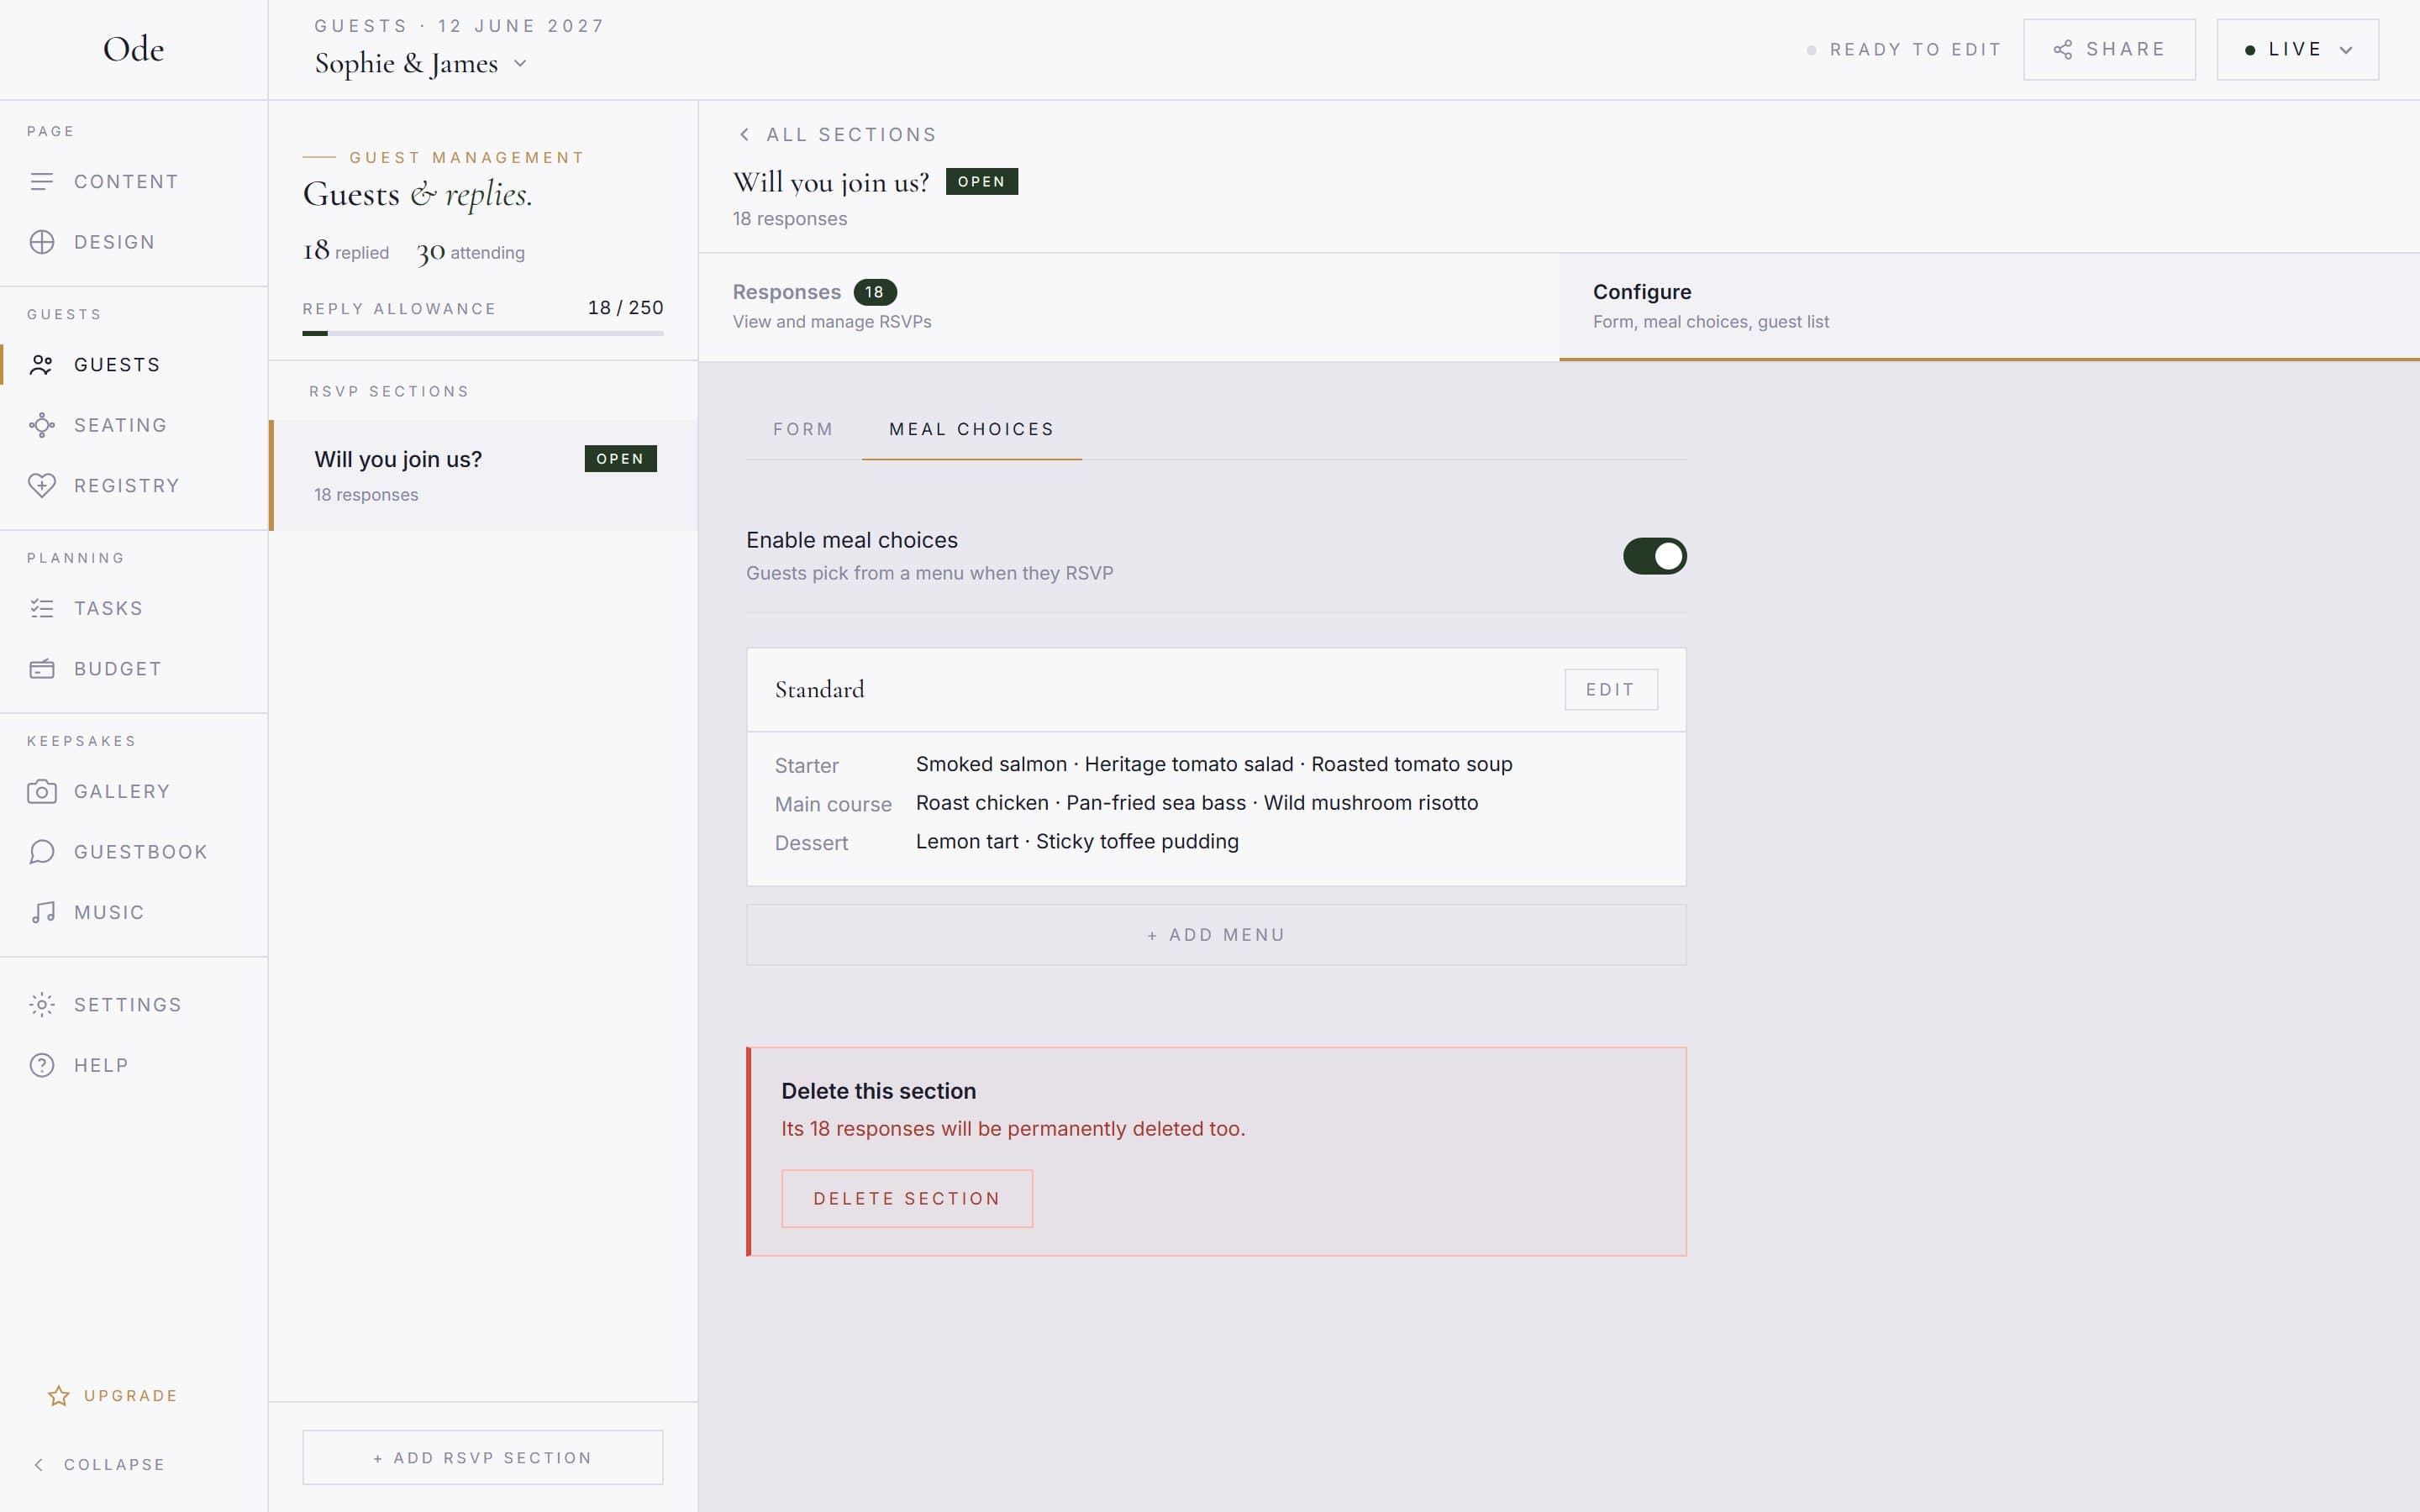
In Guests, click the new section, badged Guest list. Open Configure > Meal choices and switch on Enable meal choices. Press + Add menu, name it in the field marked e.g. Standard, Vegetarian, Kids, and press Add. Inside the menu press + Add courses →, type the course name into Course (e.g. Main), then each dish into Option, press Enter. + Add course starts the next one. Press Done when the menu is complete and Edit to reopen it. A three-course menu with two or three options per course is the common shape. Add a second menu called Kids if children get a different one, so parents pick the right menu per child rather than wading through adult options.
You do not add “no thanks” or “dietary” as options. Every course on the guest form automatically carries two extra pills, No thanks and Dietary needs. The second one flags the guest for a follow-up without collecting any medical or religious detail through the form. You contact them yourself.
Add the guest list.
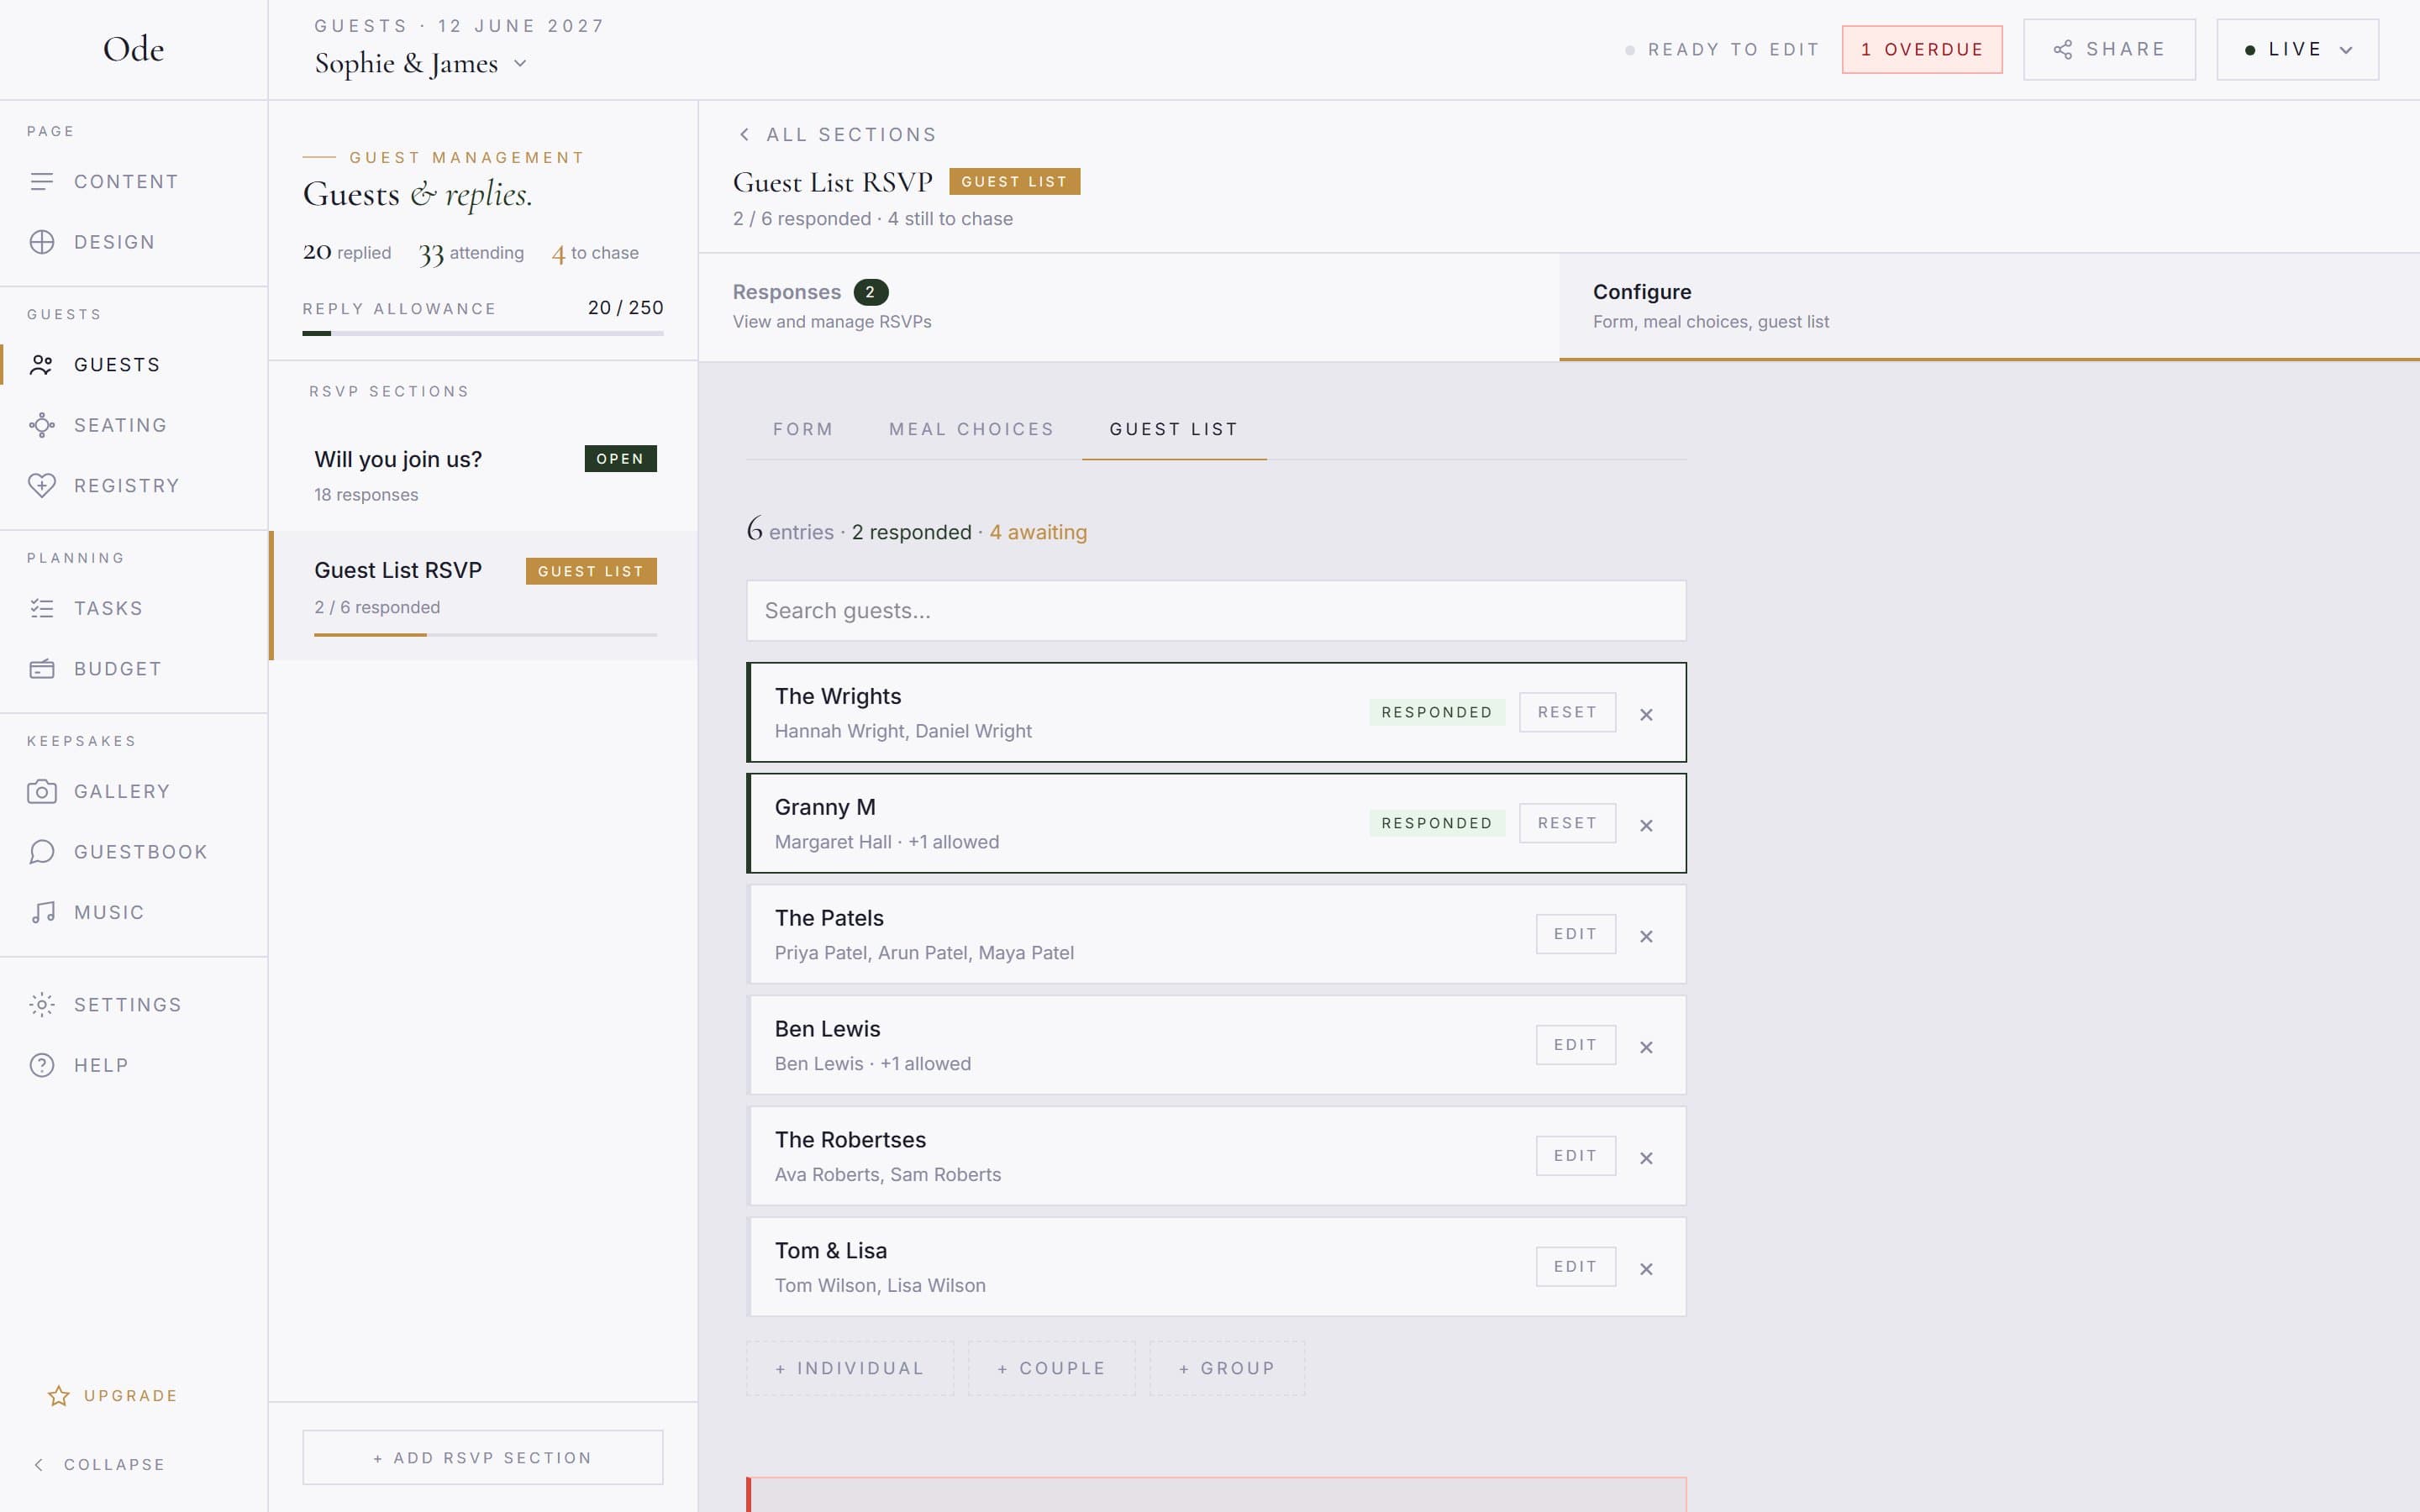
On the Guest list sub-tab, add entries as households. + Individual takes a Guest name. + Couple and + Group take a display name in Group name (e.g. The Smiths) and a name per member in Member 1, Member 2 and so on, with + Add member up to ten. Plus ones allowed: sets how many extra people that household may bring beyond its named members, and None is right for most. Press Save guest. Spell names the way the guest would type them, because searching is how they find their invitation. A section holds up to 500 entries.
Form settings and deadline.
On Form, the mode notice reads Guest list: you define who can respond. Set the Custom message, Button label and RSVP deadline (optional) as before. There is no plus-ones toggle here. Extras are set per household on the list.
What a day guest sees.
They press the button, type into Find your invitation and pick their household. They mark each named person Coming or Can’t make it, choose a menu and one option per course for each person, with a counter like Meal 1 of 3, add a message and press Send RSVP. Someone who cannot find their name reads No matching guests found. and is told to contact you, which is the safety net for misspellings.
Reading replies and the catering numbers.
Responses lists every reply. Expand one for each person’s courses and a Follow up badge where they chose Dietary needs. The Awaiting filter shows invited households that have not replied, and the header counts them as 4 still to chase. On the right, Catering summary totals every option across attending guests, and Download PDF for caterer turns it into a print-ready sheet. See Manage replies for late changes and resets.
9. Music requests
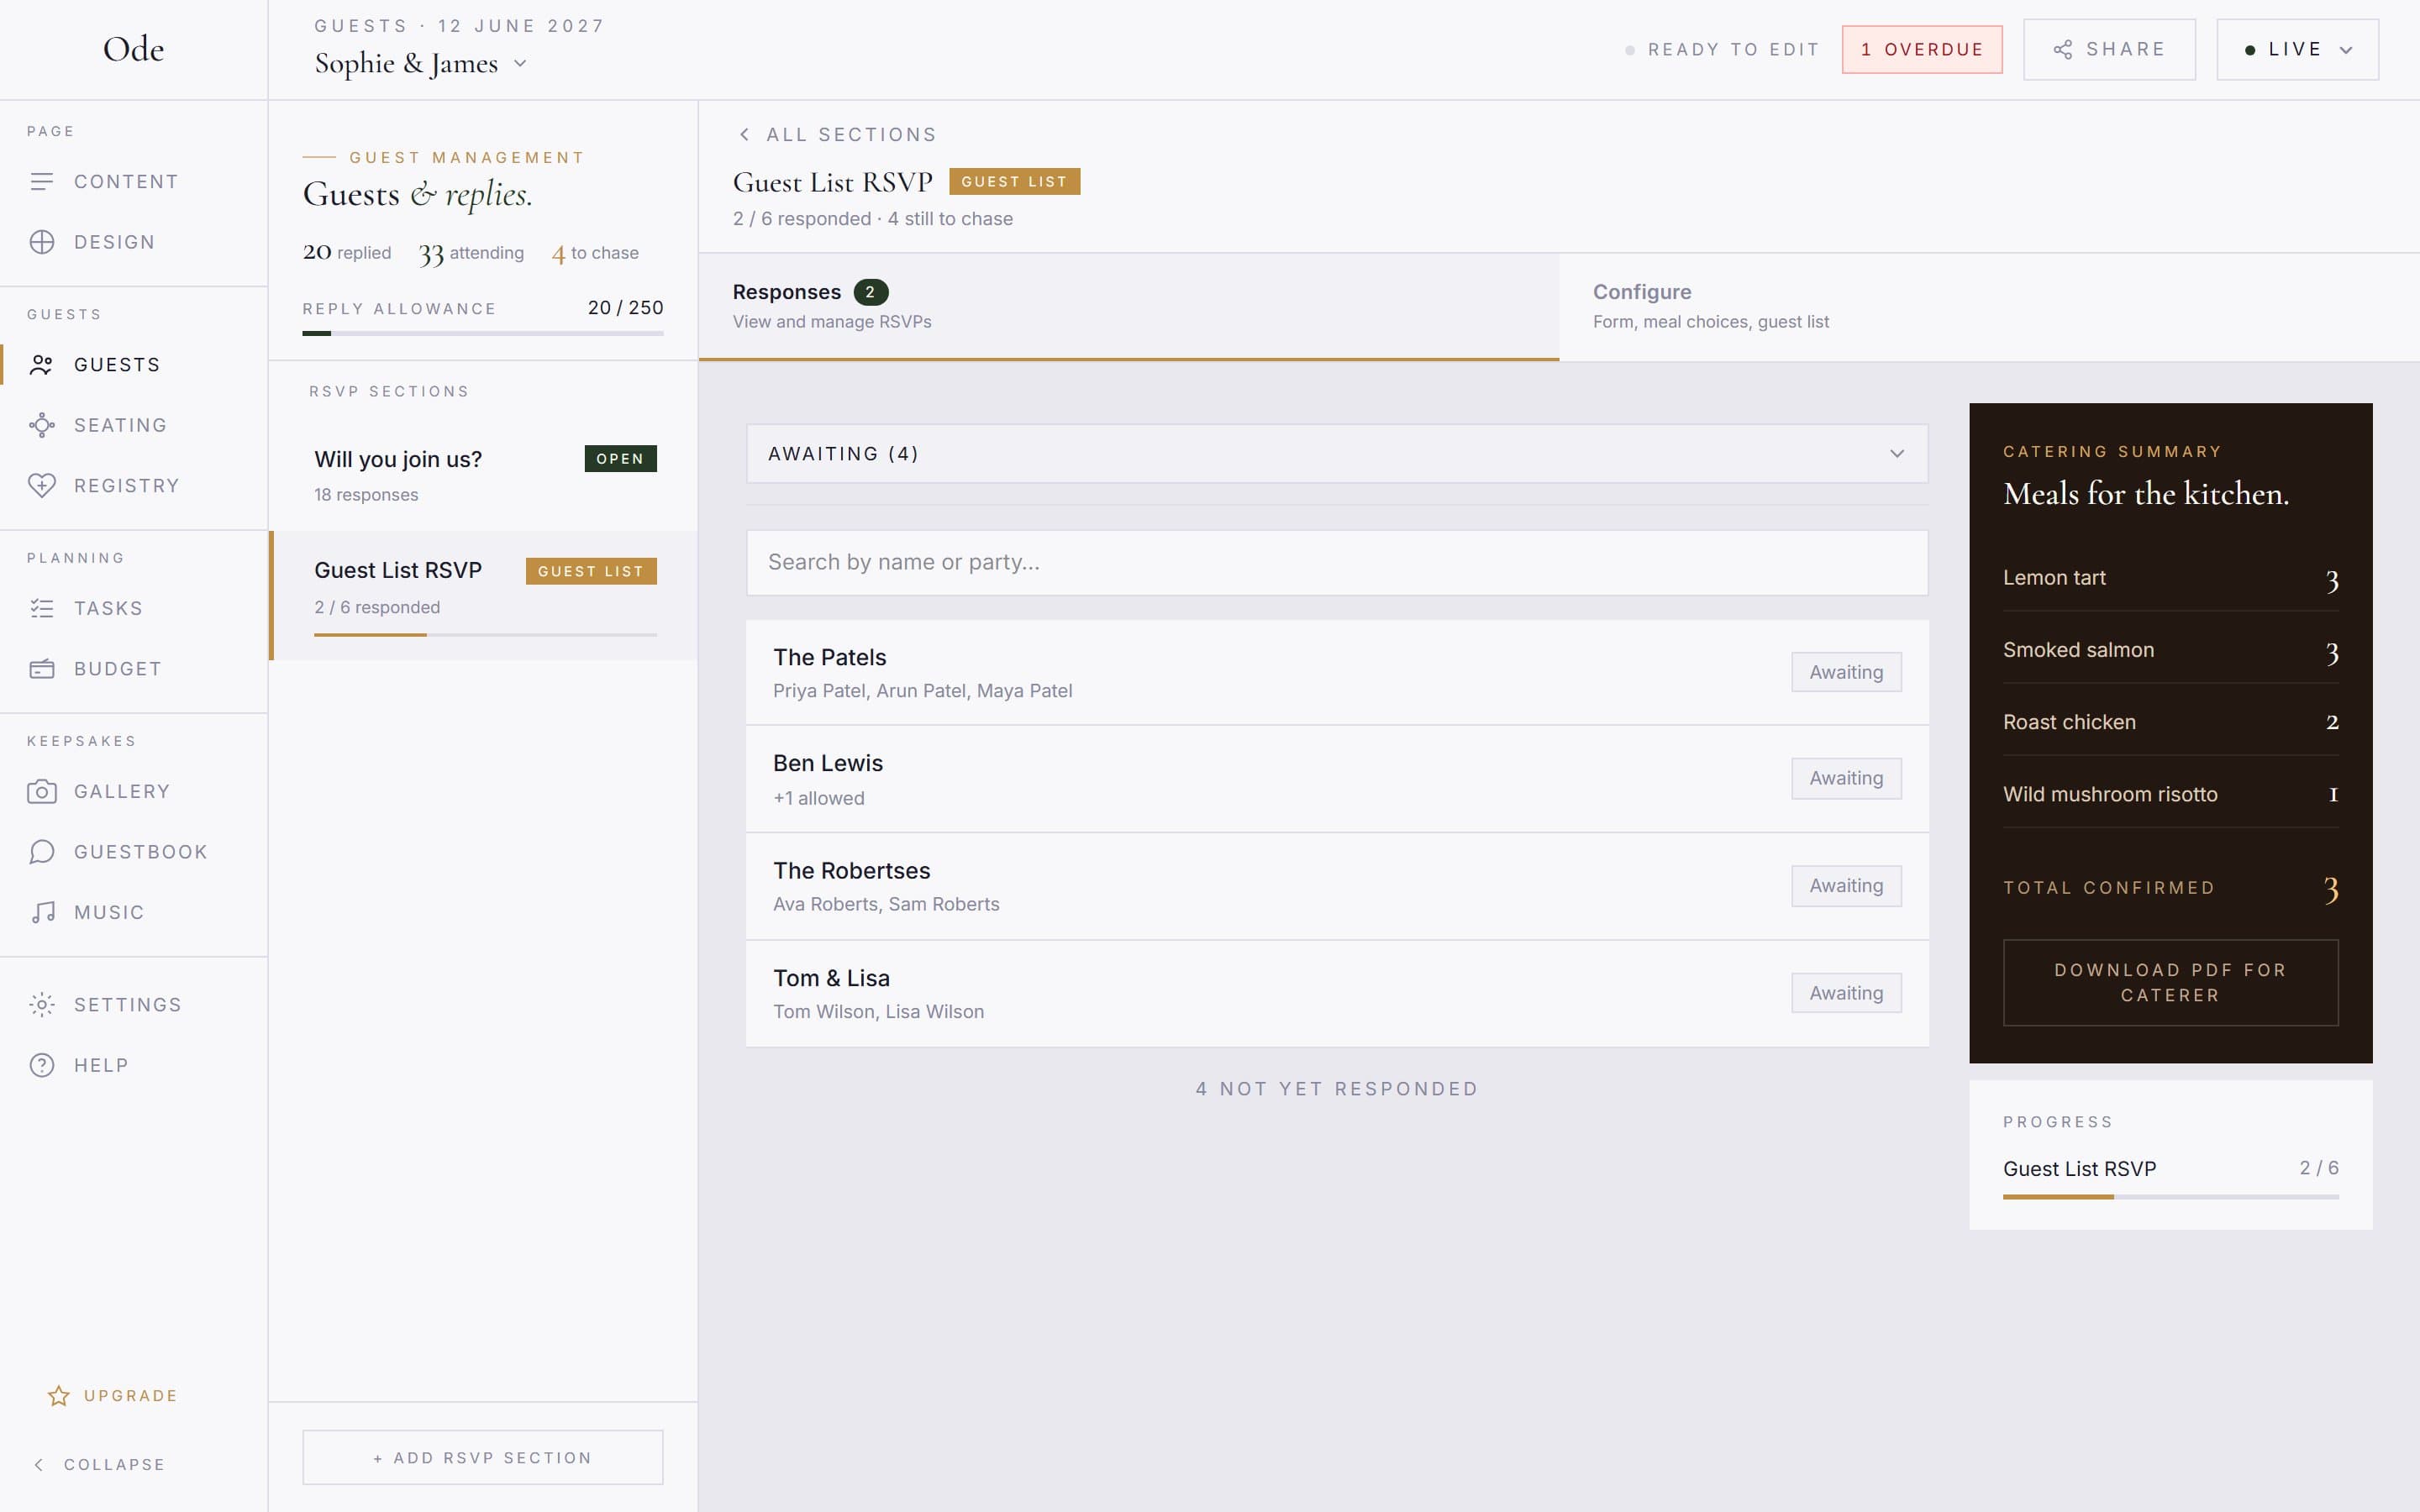
Add Music requests from the library under Media. The tile is locked below Plus. On the page, the inspector has one setting, Message to guests (optional), for a prompt such as “What song will get you on the dance floor?”. Guests fill in Song title, Artist and Your name (optional) and press Request. Requests collect in the Music workspace, grouped by song with a count for repeats. Download PDF gives you the list, with who asked for each song, to send to the DJ or band. Details are in Guestbook, music requests and the gift registry.
10. Gift registry
Add Gift registry from the library. It is available on every plan, with 10 items on Free and 20 on Starter and Plus. Items are managed in the Registry workspace. Press Add item, fill in Gift name, Qty, Guide price (£) and Buy link (optional), then press Save. Guests claim items from the page so nothing is bought twice. Each row shows a claimed-of-quantity badge with View claims, and a Release button if someone changes their mind.
On the page, the section’s inspector controls Who claims gifts: Require name, Name optional or Fully anonymous. It also has Show claimed status to guests, which lets them see what is taken but never who took it. A cash or honeymoon fund works as an item with a link and a large quantity.
11. Guestbook, photo album and seating
Three more sections round out the day. Each has its own guide, so this is the short version.
Guestbook (Starter and above).
Add Guestbook from the library. The inspector has an Invitation message (optional), a Show messages on your page toggle, and How messages are shown with Carousel, Cards, Ticker or Book. Messages arrive in the Guestbook workspace, where Book view lays them out as facing pages.
Photo album.
The template includes it. The section inspector sets Show preview, Photos to show and the Upload button. The Gallery workspace’s Settings tab holds Guest uploads, Require moderation and the Album window, which opens on your wedding day and stays open for 90 days on Plus. Photos are screened automatically before they appear. See Set up the photo album.
Seating plan (Plus and above).
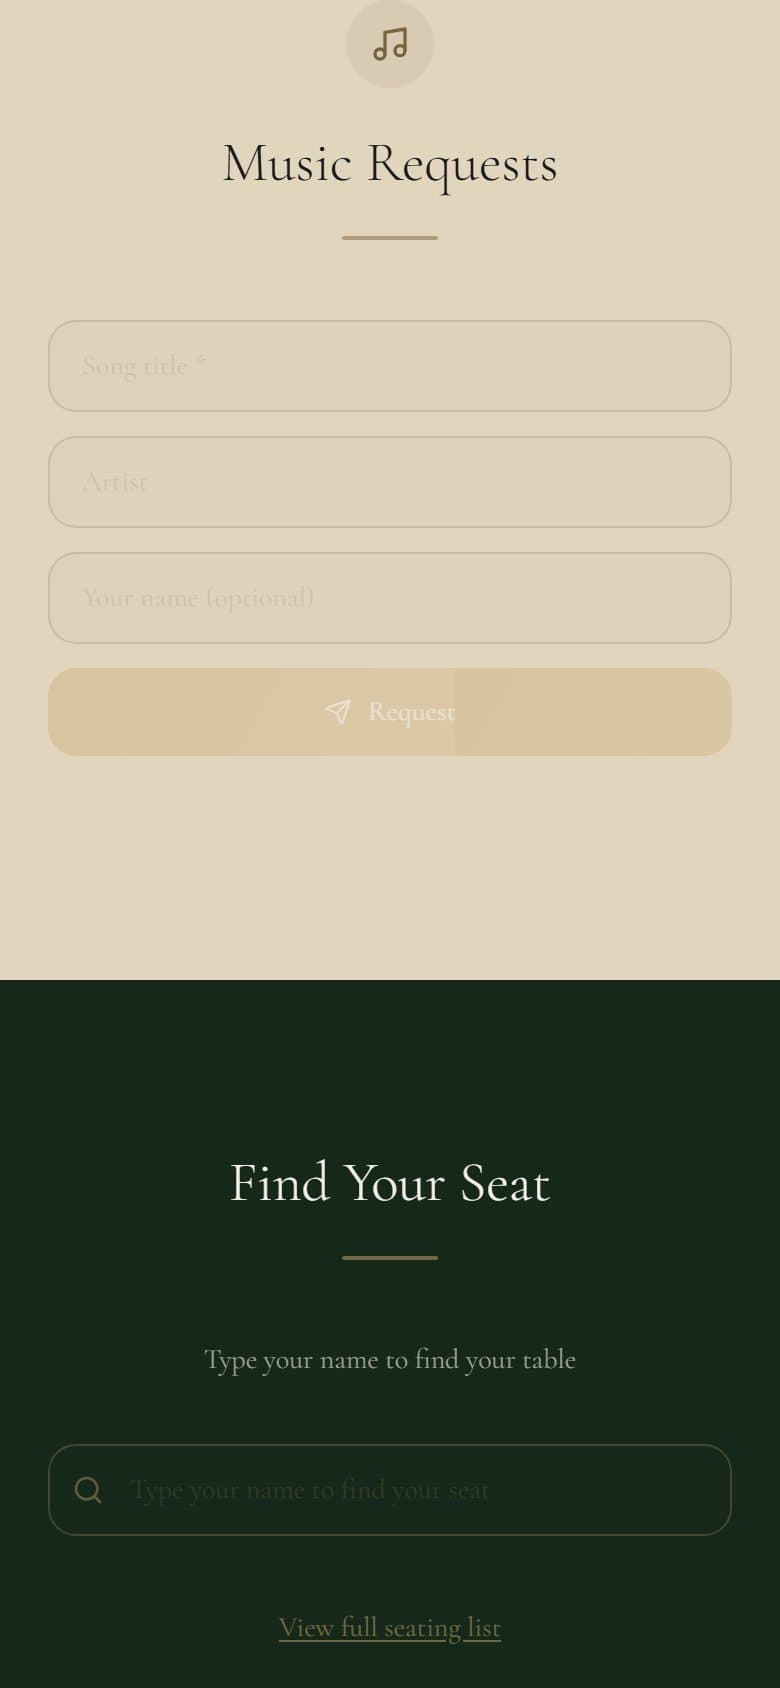
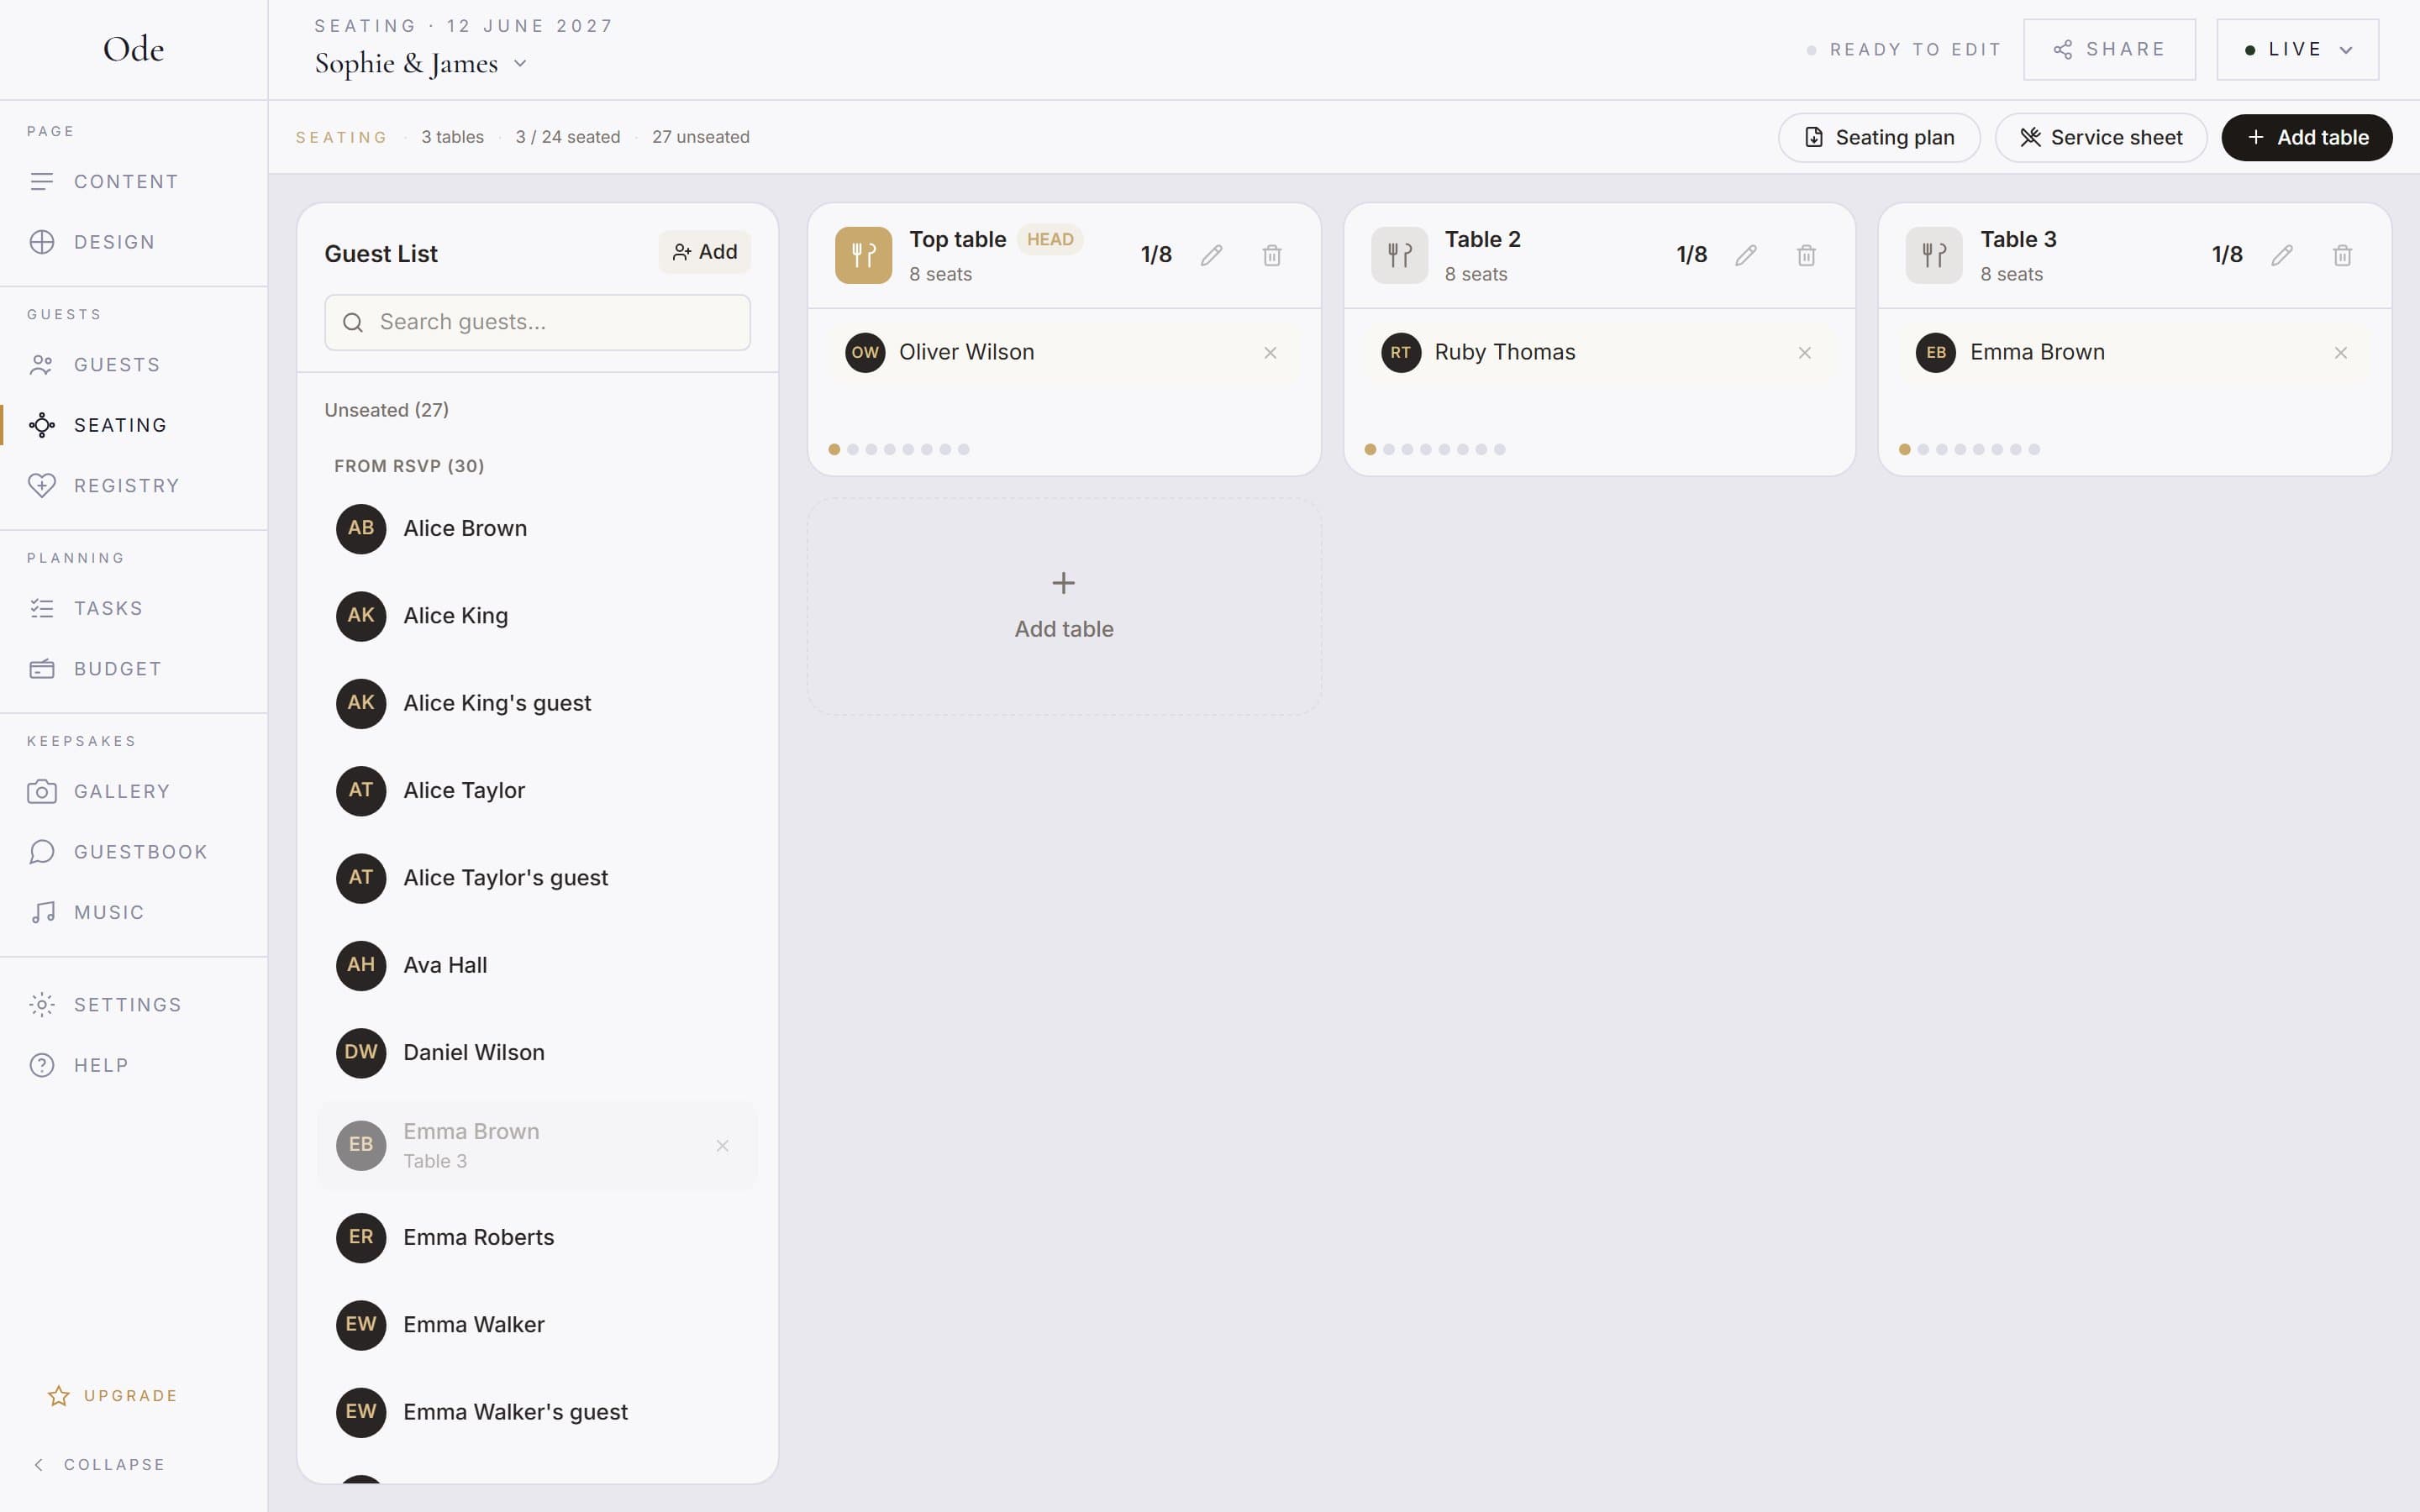
Once the breakfast replies are in, the Seating workspace lists every attending guest from your RSVP sections on the left. Press Add table, then drag names onto tables. Add the Seating plan section to the page so guests can type their name on the day to find their table, and download the Seating plan and Service sheet PDFs for the venue and the kitchen. See Build the seating plan.
12. Check it, go live, share the link
Walk the page as a guest.
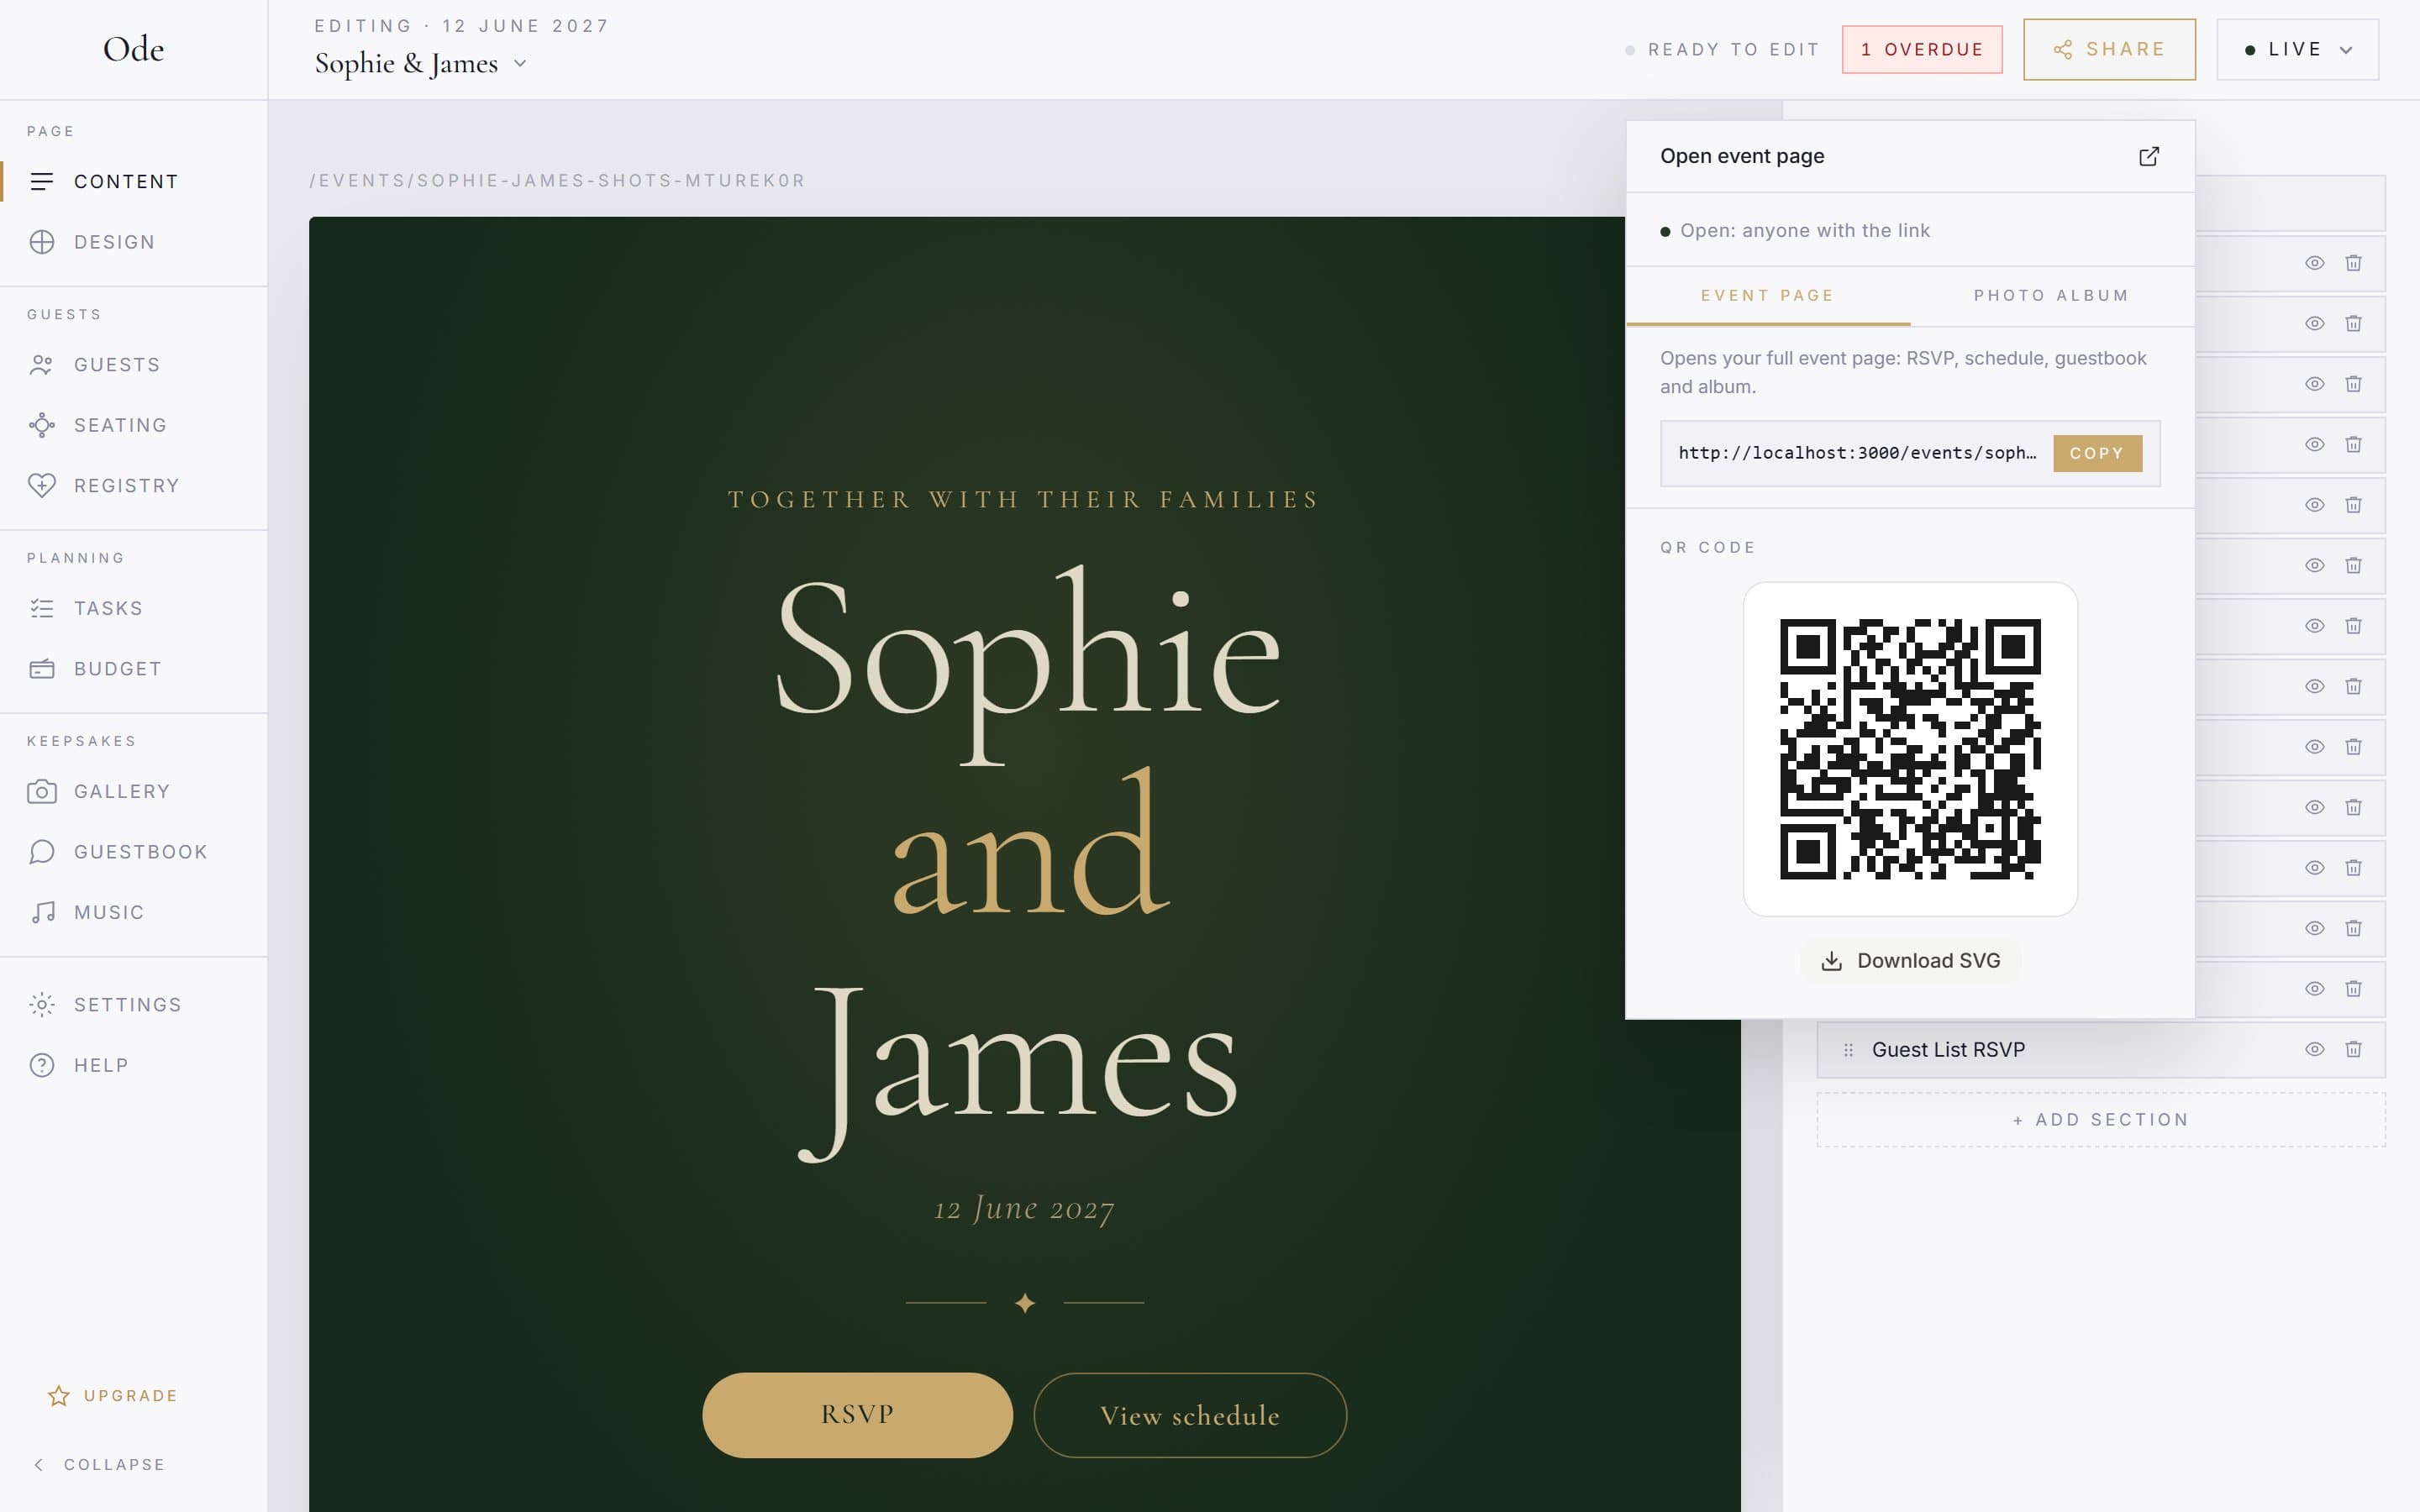
Press Share in the masthead and Open event page to see the real page in a new tab. Read it on your phone, because that is how nearly every guest will see it. Check that the cover buttons land on the right sections, that the two RSVP forms are labelled so the right guests use the right one, and that the schedule times match the invitation.
Set the status to Live.
Click the Draft pill and choose Live. If you never unlocked a plan, press Publish → and pick one instead. From now on every saved change is visible to guests immediately. There is no separate publish step for content. What Draft, Live and Ended mean is in Go live and share your link.
Share the link and the QR code.
The Share popover has two tabs. Event page is the link for invitations and messages, and Copy puts it on the clipboard. Photo album is the same link with /gallery on the end. Its QR code, saved with Download SVG, is the one for table cards and the welcome sign, so guests land straight in the album on the day. If you set a password under Settings > Access & permissions, put it on the invitation next to the link.
13. Set a password
A wedding page does not have to be findable by anyone who guesses the address. A password on top of the link means a forwarded link alone is not enough to get in. It is optional, and most couples skip it, but it is the right call if the page carries the venue address and the date for a private event.
Set it in Access and permissions.
Go to Settings > Access & permissions. Leave Who can access this event? on Anyone with the link. Type the password into Set a password and press Set password. The panel then reads Password protected. Six characters is the minimum. Pick something you can say out loud and print on the invitation, such as the venue name and the year.
What guests see.
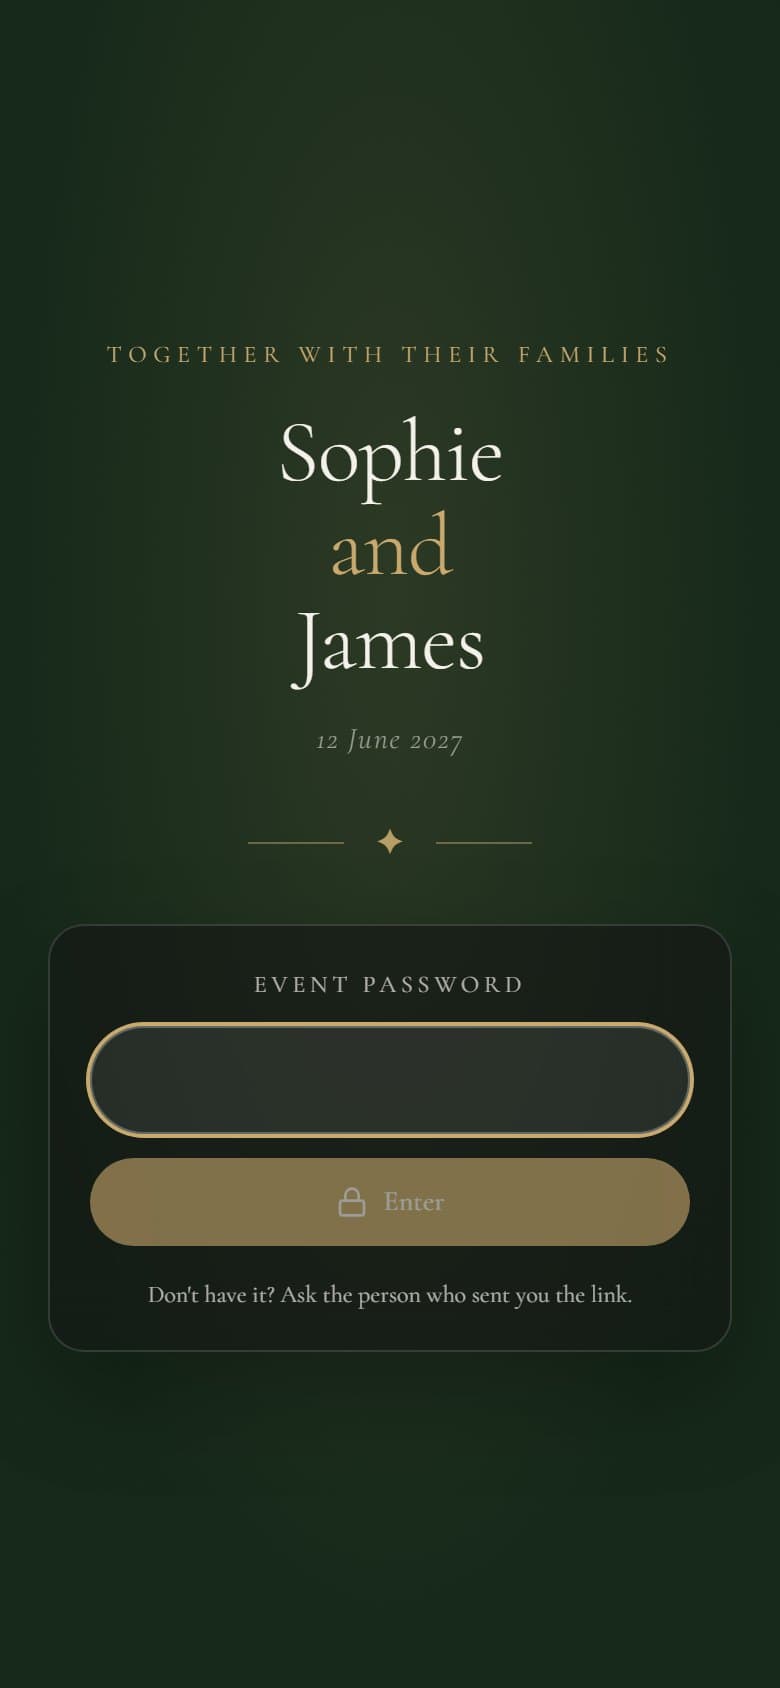
Opening any page of the event sends them to a join screen at /events/your-address/join. They type the password once and press Enter. A correct password sets a cookie in that browser, so they are not asked again, and it covers the photo album and upload pages too. Wrong guesses are deliberately slowed down. Someone without the password reads Don’t have it? Ask the person who sent you the link.
Changing or removing it.
The password is stored hashed, so it cannot be shown back to you. To change it, type into Enter new password to change and confirm with Yes, change password. Every guest is logged out at once, which is the way to shut out someone you no longer want on the page. To remove it, press Remove and confirm with Yes, remove password. The Share popover’s access line updates to match, so you can always see which state the page is in.
14. Add a co-organiser
You do not have to run everything from one account. A partner, a parent or a capable best man can share the studio. Free has no co-organisers, Starter allows one, Plus two and Complete five. The full guide is Invite a co-organiser.
Send the invite.
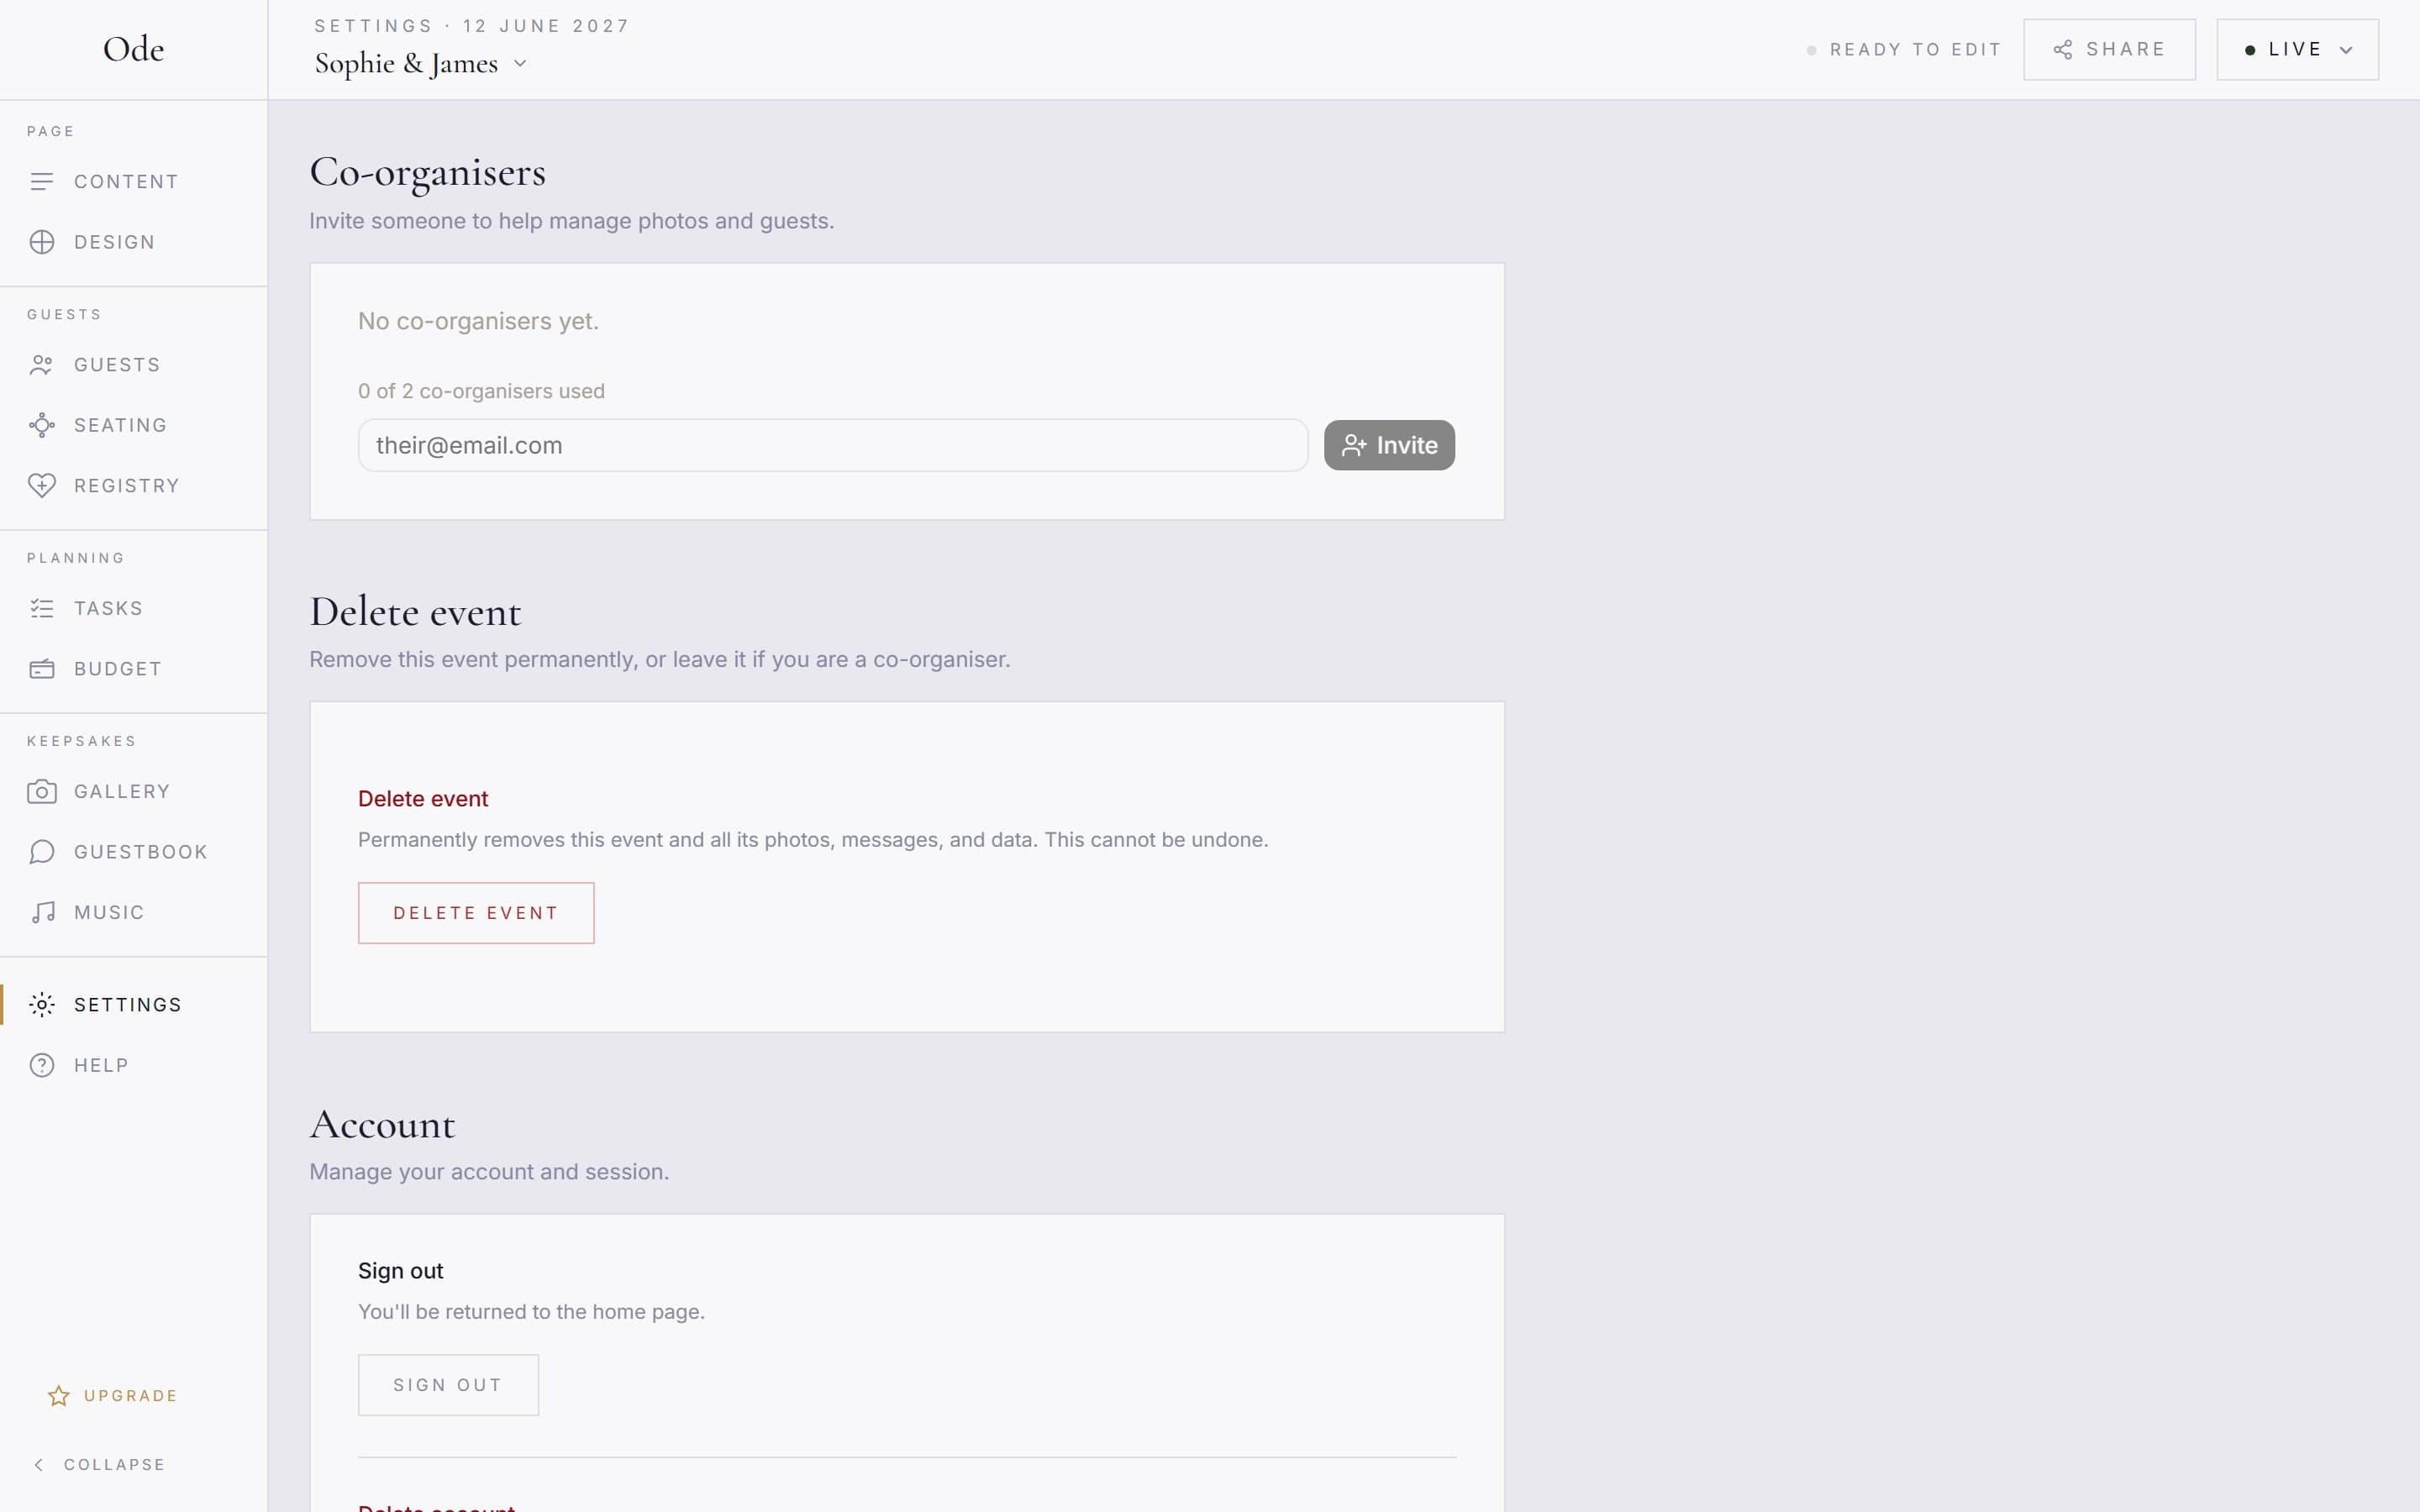
Go to Settings > Co-organisers. Only the event owner sees the invite form, with a line such as 0 of 2 co-organisers used. Type their email into the their@email.com field and press Invite. The panel confirms with Invitation emailed to… and lists the address under Pending invites with its expiry date.
What they can and cannot do.
They accept from the email, signing up if they need to, and the event appears in their studio. They get every workspace: content, design, guests, gallery, seating, guestbook, music and the registry. Four things stay with you. A co-organiser cannot publish, cannot change the plan, cannot invite or remove other co-organisers, and cannot delete the event. Payment details never leave your account. To remove one later, press Remove next to their name in the same panel.
After the day
The page keeps working. The album accepts uploads until its window closes, then the photos are deleted, so download what you want to keep first. RSVP replies are deleted 90 days after the event, and the whole event a year after. The studio warns you by email before each. When you are done collecting, click the status pill and choose Ended. The page and album stay up for guests to look back on, but RSVPs, uploads, messages, song requests and gift claims close. You can switch back to Live at any time.